BASIC ELECTRONICS
VIDEOS & WORKSHEET - PART 03
TOTAL VIDEO  TIME: 15 minutes

Today, you will continue viewing videos and fill out a worksheet as you listen.  Afterwards, you will have a few exercises to complete.

Link to videos:

https://www.youtube.com/watch?v=r-X9coYTOV4&list=PLah6faXAgguOeMUIxS22ZU4w5nDvCl5gs&index=1&disable_polymer=true

separator-blank.png

TASK #1 - VIDEOS & WORKSHEET

Watch the videos (link above) and fill in the worksheet as you go.

Beginner Electronics 11 – The Multimeter (3:53)

a)     A ___________________ is a tool that allows you to measure a variety of attributes about a circuit.


b)     ______________, _____________ and ______________ are the most important attributes that your multimeter needs to be able to measure.


c)     The cables that plug into the multimeter have _____________ _____________ at the end of them.  It is these that you plug into your circuit to check an attribute.


d)     By placing each test probe on a different _____________ of the battery, we can measure its voltage.


Beginner Electronics 12 – Schematic Basics (5:14)


a)     A _______________ is basically a blueprint of a circuit that we want to create.  At school, we tend to use the term circuit diagram instead.


b)     On a schematic, the lines connecting different components are ____________.


c)     The symbol with 4 vertical lines represents a ______________.  (Of course, in another circuit, the symbol could be flipped on its side and all lines would be horizontal instead.)


d)     On the battery symbol, the ______________ terminal is the side with the short line that looks like a vertical minus sign.


e)     
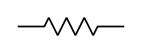
The squiggly line symbol represents a ______________.


f)
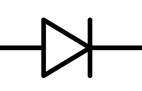
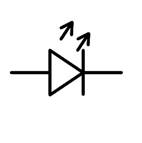
       An _____________’s symbol consists of a triangle pointing towards a line along with arrows pointing away from the symbol.


g)
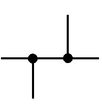
     Associate each 
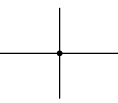
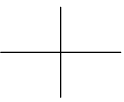
name/description with its symbol below:

Three wires connecting    ______

Battery   ______

Two wires not connecting    ______ & ______

Diode   ______

LED   ______

Two wires connecting    ______

Resistor   ______


1)

https://lh4.googleusercontent.com/66MN5d_R7uBrkVu9zR8mu8kdAIe_Ii9bvk-9_aqmOSpa8l2jv1tC2IP9WihCvwn1-JSxUPIRvIfldzCtWElZ_Lw3rT_11RMfO0-pk2f4ZXMYgvvYaO8NHA3XKBxPCvTRaE9tTJWW

2)

https://lh6.googleusercontent.com/pbEVjjA1aeLtNyqFmA6j2_ySVQu1-37_emc0TYPcdHWEm3WlbGVdOFRYqnnVtZQZLXng6Oyg0bcj1aVSQ5M-LJw8qE-SrEb3ifdtYh1RUyDmJUGl68Gnzfr3LiarjmJV05KahiBl

3)


https://lh4.googleusercontent.com/jlhTWWnjygL3GOVrMlHds0f6MZEwRIVXIAykrSrPwzC5lUVyUefNfm5G7VbAPJgq8bgFsRPHSq8OARml0PW0Xy-iQEZ5erQcrDwsFLMa_p4PDW9CVMWmh-dgIykgzIUTp9N-4n1W

4)

https://lh6.googleusercontent.com/_4F-ehQVpKHFg57nPi09h2l8dGBHdQ6ZN2q5F9y0bCTzJp7pDGyzm8CTBrH_180MCgy62cMb2P89lF69O4ecyJ_tdeh9Kapi9q29x0iOu6VY60mh70yEhrEmaN2CGVHf6i4ID_Tt

5)


https://lh5.googleusercontent.com/MKmGsMIrogEK3AlGE1QT05JKp8sEZkCv86d0fuMHbgWVro8sC4noxzcK2XLWhP3SAFlnGDBQfaN6Mhl2sBotgHQq4Dg9CZWJjFX2rwKlS4DxMahRHZcDrYvdzugAKs6w8W09wlpX

6) 


https://lh3.googleusercontent.com/iqI1ivLsxz1Ip82fbimQ3xfkivp7MAbm0e7Msw2jZgPsDThDOlwsFGqiyJoNXj6vrjx28Snh1wERGwQJXRxK-8sj1THpRNDJTja3v1iOop_cQFv9nMEfvYoBDSyE0VGP1h_rdpj4

7)

https://lh3.googleusercontent.com/7iC-CY_TT6IDz9BiyhOqP9BdYyFx2_YyTRJmPmURhLpx0cSWk-9FXlnproI1JNe6Dqfmf9VGGAWQU8o8INfDDQ6I5po3NBJ0La1e4PbUYbUWttmvvMMF76eebEfVNTcxVlxDYph7

8)

https://lh4.googleusercontent.com/ltXSxzby98h2SxP7-WCmJwUCUsK8FoZvK4A7u_iVxttO9O3A-6yaAIm6uRP5LjBd8wo8t81Q7CrYUU4k5MeDSr9FZ2SPtE5GY9MFm8geJuO7vv4hdrX2kvyIed6F3yjItQAvykMC


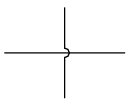
Note: Avoid using the symbol 6 as it causes confusion.  Use symbols 1 or 2 when wires either connect or don’t connect.

Beginner Electronics 13 – Switches (5:57)

  • We will only focus on the SPST switches though the other types of switches are very cool.  :)


a)     SPST stands for _____________ _____________ ______________ _____________.


b)     
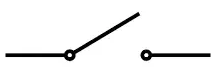
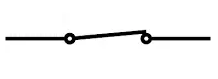
Associate each switch position with its symbol below:

            Switch in ON position ______

            Switch in OFF position ______


1)

https://lh4.googleusercontent.com/Pz3U2rLqUyNXpiY27l8vBcFxnF1CNU5wXQGZceTkIb4nBLjkxVVsmbPOuSmtaSAqZkFXRNjMnVfE2-GwkJx86ogX9eZXzaXwLwuwbLPrZEU2ckd-jsd4wsL9wuVvgwxieqdqxkT0

2)

https://lh4.googleusercontent.com/7Lsv4RYjdyzrSjw2ukQ3xBpao6sk5J0bi1t-6cs3ShwhP_niMRDFghv5FD8fNb_xe3kzF78weck0PwxONgqSDkHfdWjkmXGKQHm-fL6t3yojbe5OXb5Zo_UTOgqXBcLOQApD-4c1


EXERCISES

QUESTION #1 of 2
Draw the following circuits on paper.  The answers are below for you to compare.

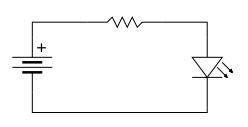
a)     Conventional current leaves the positive terminal of the battery, goes through a resistor and then goes through an LED before 
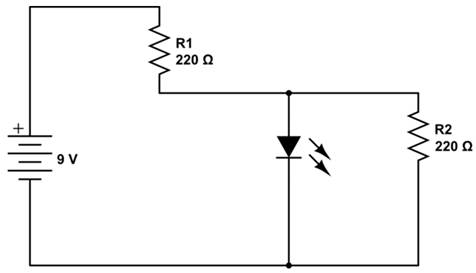
returning to the battery’s negative terminal.

b)     Conventional current leaves a 9V battery and goes through a 220 ohm resistor (R1).  The current then has a fork with one branch containing an LED and the other branch containing another 220 ohm resistor (R2).  Both branch then merge together and return the current to the battery.

Include the information for the resistors and the battery on the diagram.


QUESTION #1 SOLUTIONS BELOW


Solution a)

https://lh6.googleusercontent.com/vVDkhx7PZRQjGuinZkuLvDS6qNnO4tHe8s8wZ5BhI7oJXs3EkS-U0u-3O5T7liFFpNsFccoV3_mAtmdKLl8e0QEBRbF1_HDs9kkn7wp07perQDavzVnPYYEUvwS6hWsKcayvI7LE

Solution b)

https://lh4.googleusercontent.com/ubJJH3iOThcxXhYm4TseiZUELDqDB4teGxtE-GOAYv-SrrHrweNevKWuZatQwfFjTD4SGSd9vvmaWnDinsn9MBdVB3kyuBjEISsWZ8LN2lvC7l8SH9qwp5g0_0TQ9aMikGZPWGt_


separator-blank.png