STARCRAFT AI


Below are the steps I used in 2024 to make this work.  However, I used the tutorial found here to help me get going:  

https://github.com/JavaBWAPI/JBWAPI (tutorial at bottom)


STEP 1 – INSTALL JAVA JDK


Install the latest Java JDK from Oracle. 


STEP 2 – INSTALL ECLIPSE


Install the latest version of Eclipse (for Java Developers) from eclipse.org.


STEP 3 – ECLIPSE PROJECT


Create an Eclipse project for your StartCraft AI bot.


STEP 4 – GET JBWAPI JAR

Instead of getting the JAR file, you can use Maven or Gradle to make this work.

a)    Download the latest JBWAPI jar file from GitHub.  Link: https://github.com/JavaBWAPI/JBWAPI


b)    Right click on the project name and choose NEW > FOLDER.  Name the folder JARS.

c)     Copy and paste the downloaded JAR file into the JARs folder.

d)    Inside Eclipse, right click on the JAR file, choose Built Path > Add to Build Path.


STEP 5 – HELLOBOT CLASS


Create a HelloBot class and copy the following code into it.


Note: If you didn’t do the previous step correctly, the code below will contain many errors.


import bwapi.*;


public class HelloBot extends DefaultBWListener

{

       private BWClient bwClient;


       @Override

       public void onFrame()

       {

             Game game = bwClient.getGame();

             game.drawTextScreen(100, 100, "Hello World!");

       }


       public static void main(String[] args)

       {

             HelloBot bot = new HelloBot();

             bot.bwClient = new BWClient(bot);

             bot.bwClient.startGame();

       }

}


STEP 6 – STARCRAFT GAME


Copy your Starcraft folder to c:/Starcraft.

STEP 7 – BWAPI & CHAOSLAUNCHER

Download the BWAPI setup file (I used 4.4).  You will have to specify the location of your Starcraft folder (C:/Starcraft).


You will be asked to specify where to install BWAPI.  I chose C:/Starcraft/BWAPI to keep both the Starcraft files and BWAPI files together.


STEP 8 – RUNNING 
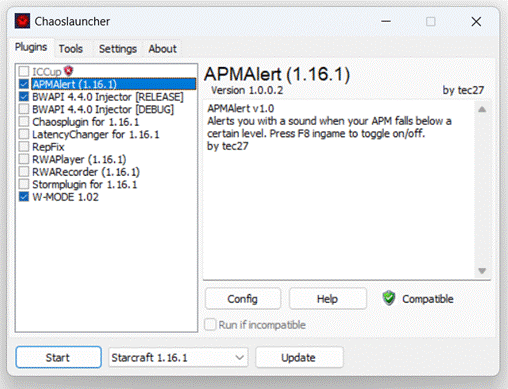
CHAOSLAUNCHER


In the BWAPI folder (C:\Starcraft\BWAPI\Chaoslauncher) find the ChaosLauncher folder and run the ChaosLauncher.exe file.


Check the plugins below.  Under Settings, you can also uncheck the warning about admin priviledges.


STEP 9 – LAUNCHING STARCRAFT


In ChaosLauncher, hit Start.  Starcraft begins.  You can now run your Java program and it should connect to the game.  You can start a game and you should see the Hello World message once the game begins.


LINKS


SSCAI (https://sscaitournament.com/) – Old tournament runner


BASIL (https://www.basil-ladder.net/) – Current tournament runner


JBWAPI (https://github.com/JavaBWAPI/JBWAPI)


OLD STEPS


These are old steps that I was working on when I realized that JBWAPI could be used with 64bit software.


STEP 1 – JAVA JDK 32-BIT


The last Oracle JDK that was 32-bit was Java 8 which was released in 2014.


In 2024, the link for the last 32-bit release from Oracle is not working.  The link can be found on this page (in case it is fixed.)


In 2024, the link to the Open JDK 8 can be found here (and it works!)


Note: A local back up of the Open JDK has been made.


STEP 2 – ECLIPSE 32-BIT

The last Windows version of Eclipse that was 32-bit was released in 2018-09.


Click here for the download page.


Note: A local back up of this version of Eclipse has been made.