|
SCRATCH

APP – ONE-SPRITE
ANIMATION
DESCRIPTION
Most sprites
in Scratch have many frames or costumes.
We will learn how to display each one one at
a time creating a little animation.
STEPS
STEP 0 – NEW APPLICATION
- You need to start with a new
application. So choose File >
New. Of course, you need to save
any previous work beforehand or it will be lost.
STEP 1 – PICK A NEW SPRITE
- Click on the button to add a new
sprite. Mousing
over the different sprite options allows you to see the sprite move
between all its frames (cartoons).
Pick any sprite that is animated.
STEP 2 – NEXT CARTOON
- In Look, find the statement Next
cartoon and immediately drag it into your code area.
STEP 3 – TEST IT
- Test the statement by double
clicking on it. You should see
the sprite change to the next frame.
Double click on the statement several times to move to the next
frames.
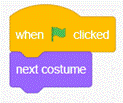
STEP 4 – EVENT
- Right now, if you run the
program, nothing happens because the statement is not associated to an
event yet.
Add a green flag event and
place your next cartoon
statement under it. Run the
program.
STEP 5 – FOREVER
& DELAY
- Instead of having to click on the
green flag every time you want to switch frames, we want to make the
switching be automatic. We do
this by placing the Next
costume statement inside of a forever
control.
- Also, to add a small delay
between frames, we use the wait (1)
seconds control.
We place it inside the forever
control. Run the program and it
should now go through all of the sprite frames over and over.
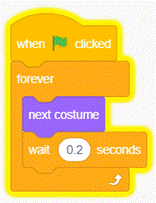
- Try different values for the delay. Maybe 0.5 is best. Maybe 0.2 or 0.1. You decide.
STEP 6 – SAVE YOUR WORK
GOT EXTRA TIME?
- If you want better control of the duration of each
individual frame (costume), you can do something like this:
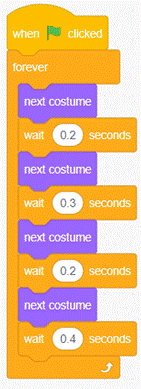
Try it out. Note
that if your sprite has 5 frames (costumes), you need 5 pairs of next costume
and wait statements.
|