Lockerby Walkthrough
Incomplete lesson plan. Using Alex Knockleby’s
code might simplify this project in the future.
You will create a small proof-of-concept project that is a walkthrough of a small part of Lockerby’s hallway. Your teacher will show you a small example.
Make sure to read all parts before starting.
PART
1 - MULTIPLE LOCATIONS
You will start by choosing a few locations that can each be seen from at least one more location.
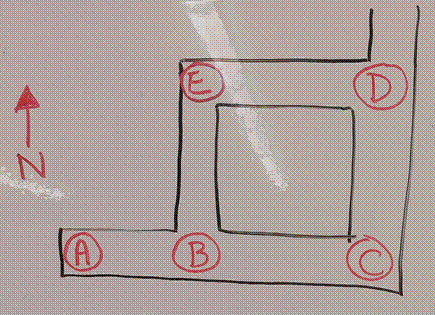
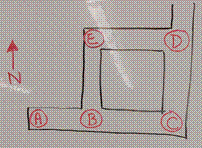
PART
2 - MAP
You should sketch a map that shows all of the locations labeled A, B, C and so on. Note that the locations could be close enough together and do not need to be at intersections.
PART
3 - LOCATION PHOTOS
At each location, you will take a photo facing the north, the east, the south and the west.
|
|
|
N
|
|
|
|
W |
|
YOU |
|
E |
|
|
|
S |
|
|


PART
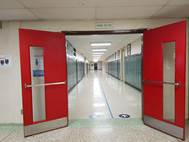
3B - SURPRISE(S)
You might also want to take an extra photo to add an extra element to your walkthrough. For example, you might take a photo with a door closed in it and the same photo with the door opened in it. Then, hitting the spacebar might open the door.
PART
4 - PHOTOS AND FILE NAMES
You first need to create a folder name walkthrough and move all of your photos into it.
You should name your photos with the following convention:
locA-S.jpg - Photo at location A facing the direction South.
locD-W.jpg - Photo
at location D facing the direction West.
Note that organizing your photos can get challenging very quickly. Take your time. You might even want to take a special photo
between locations to clearly separate your locations.
PART
5A - HTML DOCUMENT (THE CODE)
Working code will be given to you (LINK NEEDED). The code will be in an HTML document making use of the JavaScript programming language
You need to copy either the code into your own HTML document or copy the HTML document itself. Your teacher can help you with this. The document needs to be saved in the same folder as all of your photos.
PART
5B - ABOUT THE CODE
While the code is reasonably long, it is fairly simple to understand how it works in general.
The code has only two variables:
● loc - short for location, will get values such as “A” or “C”
● dir - short for direction, will get a value of either “N”, “E”, “S” or “W”.
Based on the value of loc and dir, the proper image is displayed. So, if loc is “B” and dir is “E”, the program will display the photo locB-E.jpg.
Pressing left or right will change the value of dir.
Pressing up or down will change the value of loc if it is possible to move forward or backwards. For example, if you are looking at a wall, it is not possible to go forward, so the up arrow will not have an effect.
|
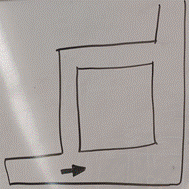
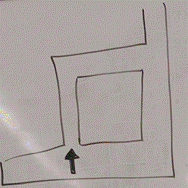
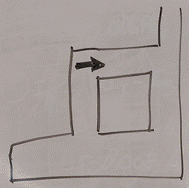
EXERCISES PART
1 Consider the following map that identifies five locations.
For each of the following diagrams, give
the value of the loc
variable and the dir
variable.
PART
2 Draw the diagram with a)
an arrow at location D and
facing the south direction. b) an arrow a loc of “A” and dir of “W”. PART
3 Give the values of loc and dir after the provided sequence of key presses.
SOLUTIONS Click here. |
PART 5C - ADAPTING THE CODE
Almost all of the existing code works for any map. There is only the upArrow() function that has to be customized to each map.
The upArrow() function is executed only after the up arrow was pressed. Its job is simply to update the variable loc (if needed).
Essentially, we have to write the code that does the following logic:
The
up key was just hit. If we are facing
towards another location, we should move to that location. This is done by simply setting the value of loc to the new location.
Otherwise, we shouldn’t do anything.
PART
6 (OPTIONAL) - ADDITIONS
Coming soon
FUTURE
ADDITIONS
Add a spaceBar() function and leave it empty.
In the switch statement, check for keycode 32 which is the space and call the spaceBar() function as well as the display function.
Introduce a way of keeping track of another piece of information.