|
GIMP MINITASKS

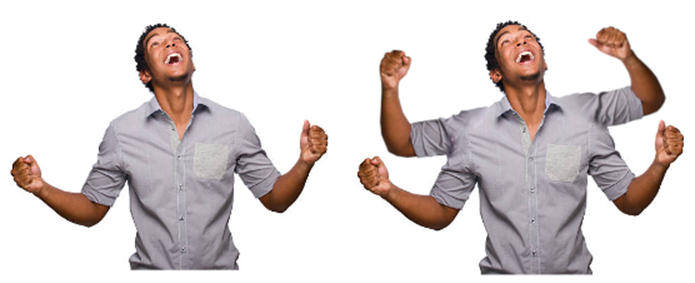
EXTRA ARMS (by
Shaun-Emily C)
You will add
arms to a person.
REQUIRED TOOLS
- Selection Tools
- Use of multiple layers
- Tools > Transform Tools > Move
- Tools > Transform Tools > Rotate
INSTRUCTIONS
- Start by finding a good photo. This requires that the person’s arms
be away from their body. Also,
having a simple background will make this easier.
- Make a copy of your layer so you have two layers. Name the top layer Person and the
bottom layer Original.
- Add a temporary empty layer (name it Temp) between
your two layers and use Tools > Paint Tools > Bucket Fill to give
that layer a bright colour (any colour).
- Select the top layer.
- On the top layer, you want to erase the background. Start by selecting around your person
by using the Free Select tool.
- Hit DELETE to erase all pixels in the
selection. You should see your
bright background coming through.
- Analyze your selection to see if you need to remove anything
else. Maybe you missed something.
ARM #1
- Create a new layer.
Call it Arm 1.
- Select the Person layer and use a selection tool
(such a Free Select) to select on of the arms.
- Paste the selection and hit the green anchor so that
it anchors onto your Arm1 layer.
- Place the arm as you see fit making use of Tools
> Transform Tools > Move and Tools > Transform Tools >
Rotate.
- Make sure the layers with the arms are behind your
firm image. Use the Smudge tool
to blur the area where the new arm connects with the body.
- Repeat the steps from ARM #1 down for the second
arm.

|