|
GAME MAKER TUTORIAL GAME MAKER IDE 2022
A – BASIC ROOM SPRITES AND OBJECTS A1 – Add the following
room sprites: ·
Water ·
FenceH ·
FenceV ·
Wall ·
Wall (No portal) A2 – For each of the
sprites above, create an object. A3 – Add the following
logo sprites which will be part of our game interface: ·
Logo (Blue) – Name: spr_logoB ·
Logo (Orange) – Name: spr_logoO A3 – Create a single
object for logo. ·
Sprite: Logo (Blue) –
Because our character will start with the blue gun selected. Note: Later, we will
add the code needed to switch the logo to the orange one. A4 – Add the following
sprite that will be used for your background. ·
Floor A5 – Open your
starting room and do the following: ·
Click on the
Background layer. ·
Choose the back sprite
(floor). ·
Check Tile
Horizontally and Tile Vertically to fill the room with the floor sprite. A6 – Still in the
room, do the following: ·
Click on the Instances
layer (important!) ·
Drag in a logo object
at the bottom (anywhere you want) ·
Add both wall and wallNoPortal objects to create a room to test in.
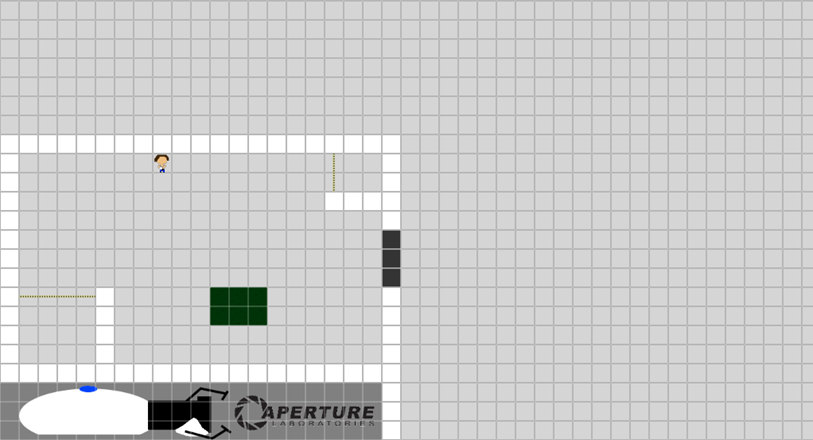
B – CHARACTER MOVEMENT Our character’s name
is Chell. We
will create chell’s sprites, object and movement
here. B1 – Add the following
four chell sprites: ·
Chell (Up) ·
Chell (Down) ·
Chell (Left) ·
Chell (Right) B2 – Create the chell object. ·
Sprite: Chell (Down) – Because our character will start facing
downwards. B3 – Inside the Chell object, add a Create event. ·
Add an Assign Variable
action (Common menu) o Name: mySpeed o Value: 2 o Do not check relative. B4 – Still inside the Chell object, add a Key Down > DOWN event. ·
Add an Assign Variable
action (Common menu) ·
Name: y ·
Value: mySpeed ·
Check relative Note: The above
action runs when the down arrow is down and it increases Chell’s
y-coordinate by the value of mySpeed which is 2 for
now. But later, we will be able to
adjust mySpeed to change Chell’s
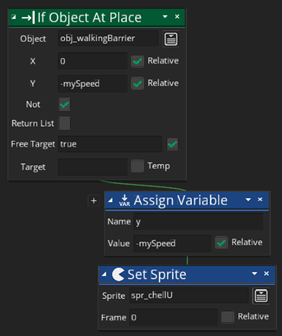
movement speed. B5 – Still inside the Chell object, add a Key Down > UP event. ·
Add an Assign Variable
action (Common menu) ·
Name: y ·
Value: -mySpeed ·
Check relative B6 – Still inside the Chell object, add a Key Down > RIGHT event. ·
Add an Assign Variable
action (Common menu) ·
Name: x ·
Value: mySpeed ·
Check relative B7 – Still inside the Chell object, add a Key Down > LEFT event. ·
Add an Assign Variable
action (Common menu) ·
Name: x ·
Value: -mySpeed ·
Check relative
B9 – Inside the Chell
object, open the Key Down > RIGHT event. ·
Add a Set Sprite action (Instance
menu) o Sprite:
Chell (Right) o Do
not change anything else. Note: The above action makes the
right facing sprite appear when we move right. B10 – Repeat the previous step for
the LEFT, UP and DOWN events but placing the corresponding sprite TEST
ROOM – Your character should move around and face the direction she is moving
in. C – HIT TESTING
OBJECTS
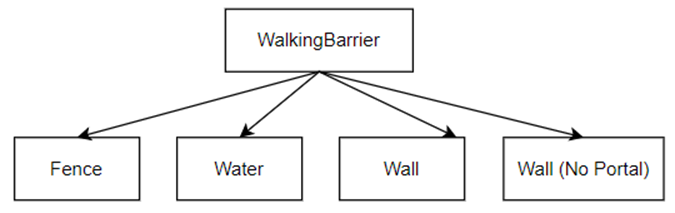
C1 – Create a WalkingBarrier object. Leave it empty. C3 – Do the same as in the previous step for the Wall object, the WallNoPortal object and both Fence objects. ·
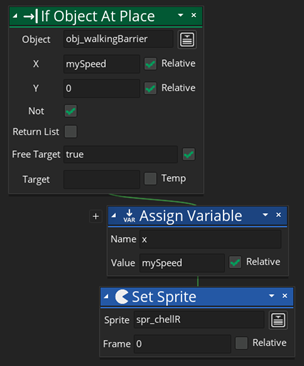
Add an If Object At
Place (Collisions Menu) o Object: WalkingBarrier o X: mySpeed, Check relative o Y: 0,
Check relative o Check NOT o Don’t
change anything else. ·
Move the pre-existing Assign Variable and Set
Sprite actions inside the above If action like shown below.
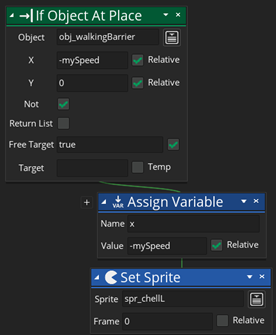
C5
– Repeat the previous step for the events Key Down > LEFT, Key Down > DOWN
and Key Down > UP from the Chell object. See below for the expected results.
TEST
ROOM – Your character should no longer go through any of the barrier
objects. Notice that your character
can get stuck on barriers at the moment. C6 – To stop the issue of getting stuck on
barriers, do the following: ·
Open each of the four Chell sprites, on the left, under Collision Masks, choose
Full Image (instead of Automatic). TEST
ROOM – Your character should no longer get stuck on barriers. D – FACING DIRECTION In this section, we
will create a variable named facing
that will keep track of whether chell is facing up,
down, left or right. This will allow
us to shoot in different directions later on. D1 – Inside chell’s
Create event, add an Assign Variable action (Common menu). ·
Name: facing ·
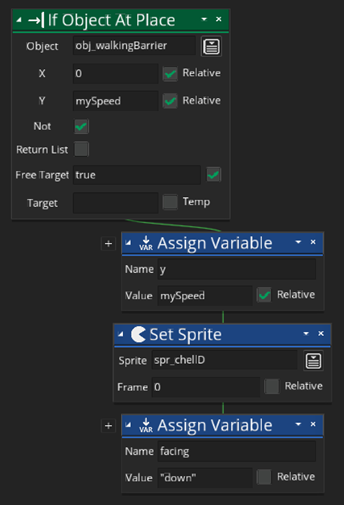
Value: "down" (Note: The double quotes are required.) D2 – Inside chell’s
Key Down > Down event, add an Assign Variable action (Common menu). Drag the action inside the if statement. ·
Name: facing ·
Value: "down" (Note: The double quotes are required.)
D3 – Repeat the previous step but
for the other directions (Up, Left and Right). Make sure to set the value of facing to "up",
"left" and "right".
And keep the double quotes too. TEST
ROOM – Nothing is different yet. You
are just checking to see if you are getting an error. If there is no error, you are good to go. E – TOGGLE SHOOTING COLOUR In this section, we
will create a variable named activeColour that will keep track of whether chell is currently holding the “blue” portal gun or the
“orange” portal gun. Chell will start off with the “blue” gun. Note that the logo at the bottom will show
the current colour. E1 – In chell’s
Create event, add an Assign Variable action (Common menu). ·
Name: activeColour ·
Value: "blue" E2 – Still inside the Create event, add a Set
Sprite action (Instances menu). ·
Applies to: obj_logo (hit the small upsidedown
triangle to set this) ·
Sprite: spr_logoB ·
Frame: 0 E3 – In chell, add a Key
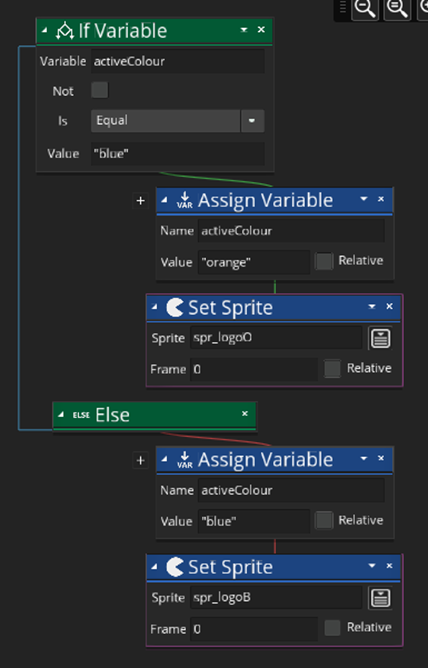
Pressed > Letter > C event that will be used to toggle the colour of the portal gun. E4 – Inside the above event, add an If Variable action
(Common menu) o
Variable: activeColour o
Is: Equal o
Value: "blue" E5 – Inside the above If Variable action, do the
following: ·
Add an Assign Variable action (Common menu). o
Name: activeColour o
Value: "orange" ·
Still inside the above If Variable action, add a
Set Sprite action (Instances menu). o
Applies to: obj_logo (hit the small upsidedown
triangle to set this) o
Sprite: spr_logoO o
Frame: 0 E6 – Under the If Variable action from above, add
an Else action (Common menu). E7 – Inside the above Else action, do the
following: ·
Add an Assign Variable action (Common menu). o
Name: activeColour o
Value: "blue" ·
Still inside the above If Variable action, add a
Set Sprite action (Instances menu). o
Applies to: obj_logo (hit the small upsidedown
triangle to set this) o
Sprite: spr_logoB o
Frame: 0 E8 – Check that your actions are all organized
like this:
TEST
ROOM – When you hit C, you should now see your logo’s colour
display toggle from blue to orange and vice versa. F – SHOOTING BLUE BULLETS F1 - Create the sprites for bulletB and bulletO. ·
Sprite names: spr_bulletB
& spr_bulletO F2 - Create an object for bulletB and bulltO. ·
Names: obj_bulletB
& obj_bulletO ·
Set corresponding sprites for each
object. F3 - Inside chell,
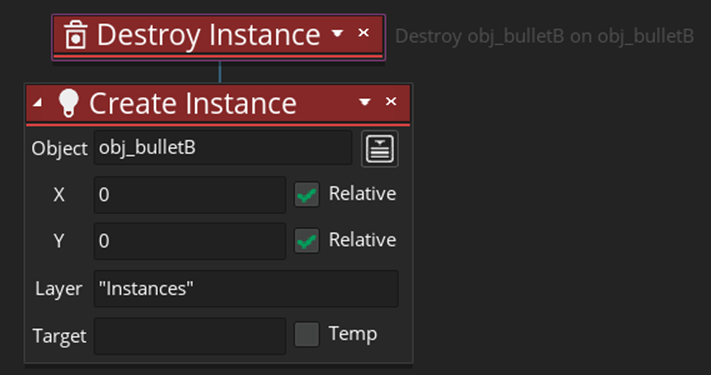
add a Key Pressed > SPACE event. F4 - Inside the above event, add a
Create Instance action (Instances menu) ·
Object: obj_bulletB
(We will
start with blue only for now.) ·
X: 0 with relative checked ·
Y: 0 with relative checked ·
Change nothing else TEST
ROOM – When you hit space, you should now see a blue portal bullet
appear. Of course, it doesn’t move and
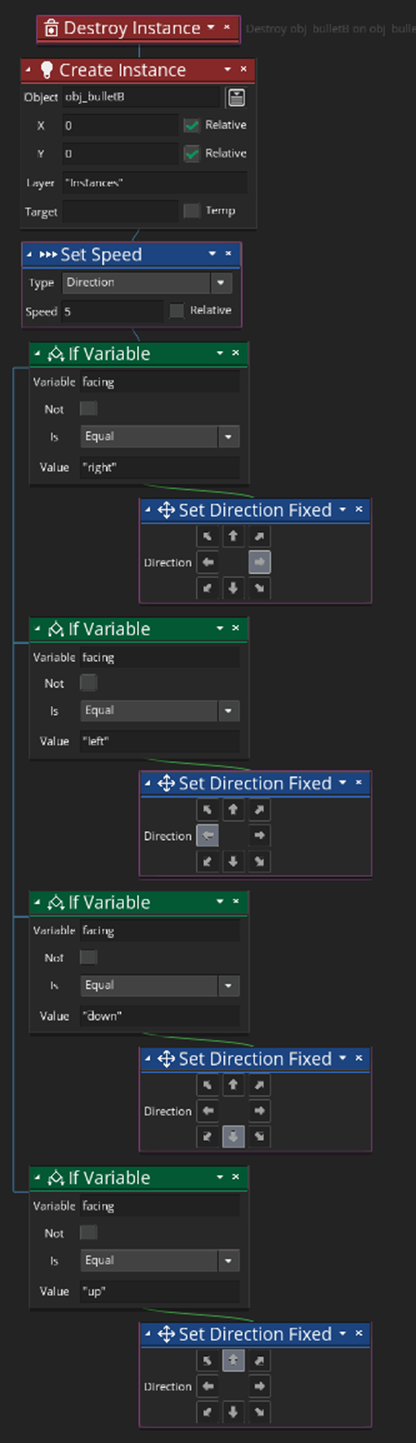
you can have multiple of them at the moment. F5 – Before the above Create Instance action, add
a Destroy Instance action (Instances menu). ·
Apply this action to obj_bulletB objects. (Hit the small triangle to do this.)
TEST
ROOM – When you hit space, you can now only have one bullet appear. F6
– Beneath the Create Instance action from above, add a Set Speed action
(Movement menu). ·
Apply this action to obj_bulletB objects. (Hit the small triangle to do this.) ·
Type: Direction ·
Speed: 5 We now need to check the direction
that chell is facing and use this to give a
direction to the bullet. F7 – To check if chell is facing right, add an If Variable action (Common
menu). ·
Variable: facing ·
Is: Equal ·
Value: "right" F8 – Inside the above If
Variable action, add a Set Direction Fixed action (Movement menu). ·
Apply this action to obj_bulletB objects. (Hit the small triangle to do this.) ·
Click on the right arrow. TEST
ROOM – When facing right, your bullet should move right. Other directions do not work though. F9 – Repeat the previous two steps
for the other directions (left, up and down).
Careful to always apply the Set Direction action to obj_bulletB. You
can visually see this by the purple rectangle that gets shown around the
action. F10 – Check that your actions look
like this:
TEST
ROOM – You can now shoot in all directions. G – SHOOTING BOTH ORANGE AND BLUE BULLETS G1 – At the top of chell’s Key Pressed > SPACE event, add an If Variable
action (Common menu). ·
Name: activeColour ·
Is: Equal ·
Value: "blue" G2 – Carefully drag all of the
other actions that were already there inside the above If Variable
action. So everything should be
indented under the above If Variable action.
(Note: This is a little messy and can lead to errors so take your
time.) TEST
ROOM – You can now only shoot if activeColour is
blue. G3 – Still inside chell’s Key Pressed > SPACE event, scroll to the top
actions and drag in an Else action (Common menu) by dropping it on the top If
Variable action. The Else should
appear at the very bottom of all actions. Note: The actions
inside the Else are the ones that will be executed whenever the active colour is orange. G4 – One by one, copy all of the
actions in the top If Variable action into the Else section. Again, take your time as this can easily
lead to errors. Double check that you
have the same number of actions as well as the same placement and order. G5 – All of the actions inside the
Else need to apply to orange bullets, not blue bullets. So do the following: ·
Change the Destroy Instance action
to apply to obj_bulletO instead. ·
Change the Create Instance action
to create an obj_bulletO instead. ·
Change the Set Speed action to
apply to obj_bulletO instead. ·
Change the four Set Direction actions to apply to obj_bulletO
instead. TEST
ROOM – You can now shoot portal bullets that are orange or blue. H – BULLET COLLISIONS WITH WALLNOPORTAL OBJECTS First, we will deal
with the easy wall collsions (wallNoPortal). H1 – Inside the blue bullet
object, add a Collsion > obj_wallNoPortal
event. H2 – Inside the above event, add a
Destroy Instance action (Instances menu). TEST
ROOM – Your blue bullets now disappear when they come into contact with wallNoPortal objects. H3 – Repeat the previous two steps
inside the orange bullet object. TEST
ROOM – Your orange bullets now also disappear when they come into contact
with wallNoPortal objects. I – PORTALS (BULLET COLLISIONS WITH WALLS) We will now deal with the
collision between bullets and regular walls that lead to portals being
created. I1 – There are four directions for
a portal and two colours of portals, so eight different sprites of
portals. Create the 8 sprites for the
portals. ·
Blue Sprite Names: spr_portalBD, spr_portalBU, spr_portalBL & spr_portalBR ·
Orange Sprite Names: sprt_portalOD, spr_portalOU, spr_portalOL & spr_portalOR I2 – Create an object for the blue
portal. ·
Name: obj_portalB ·
Sprite: Any of the blue portal
sprites will do. I3 – Create an object for the
orange portal. ·
Name: obj_portalO ·
Sprite: Any of the orange portal
sprites will do. Now that we have
created our portal objects, we will go back to our bullet object that will
create these portals when the bullets hit a wall. In GameMaker, the direction of an object is stored in the
variable direction. The value 0 means right, the value 90 means
up, the value 180 means left and 270 means down. We will use this to determine the bullet’s
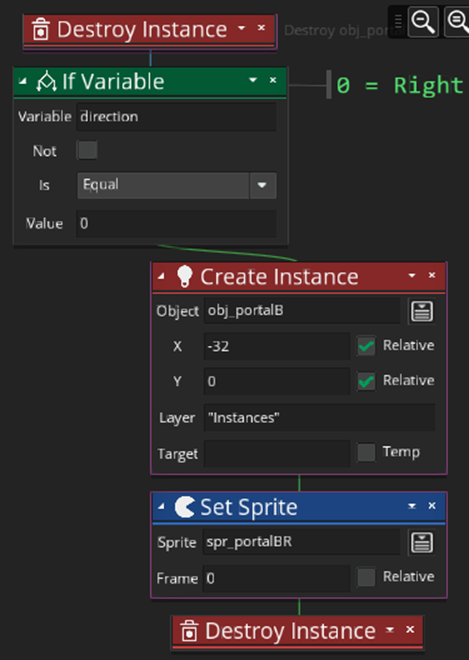
moving direction which will help us determine which portal sprite to show. I4 – Inside the blue bullet
object, add a Collision > obj_wall event. I5 – Inside the above event, add a
Destroy Instance action (Instance menu). ·
Make this apply to the obj_portalB object.
This will remove any other blue portal in the room. I6 – Still inside this event, add
an If Variable action (Common menu). ·
Variable: direction ·
Is: Equal ·
Value: 0 (Reminder: Zero means right.) I7 – Inside the above If Variable
action, add a Create Instance action (Instance menu). ·
Make this apply to the Other
object (which is the wall that is collided with) ·
Object: obj_portalB ·
X: -32, relative checked ·
Y: 0, relative checked ·
Change nothing else Explanation: The above portalB will be created in the tile exactly to the left
of the wall (x value that is 32 less than wall’s). I8 – Below the above action (still
inside the if statement), add a Set Sprite action (Instances menu). ·
Make this action apply to obj_portalB ·
Sprite: spr_portalBR I9 – Below the above action (still
inside the if statement), add a Destroy Instance action (Instances
menu). This will destroy the bullet. ·
No changes needed to this action. I10 – Your code should look like
this:
TEST
ROOM – When a blue bullet is moving towards the right and hits a wall object,
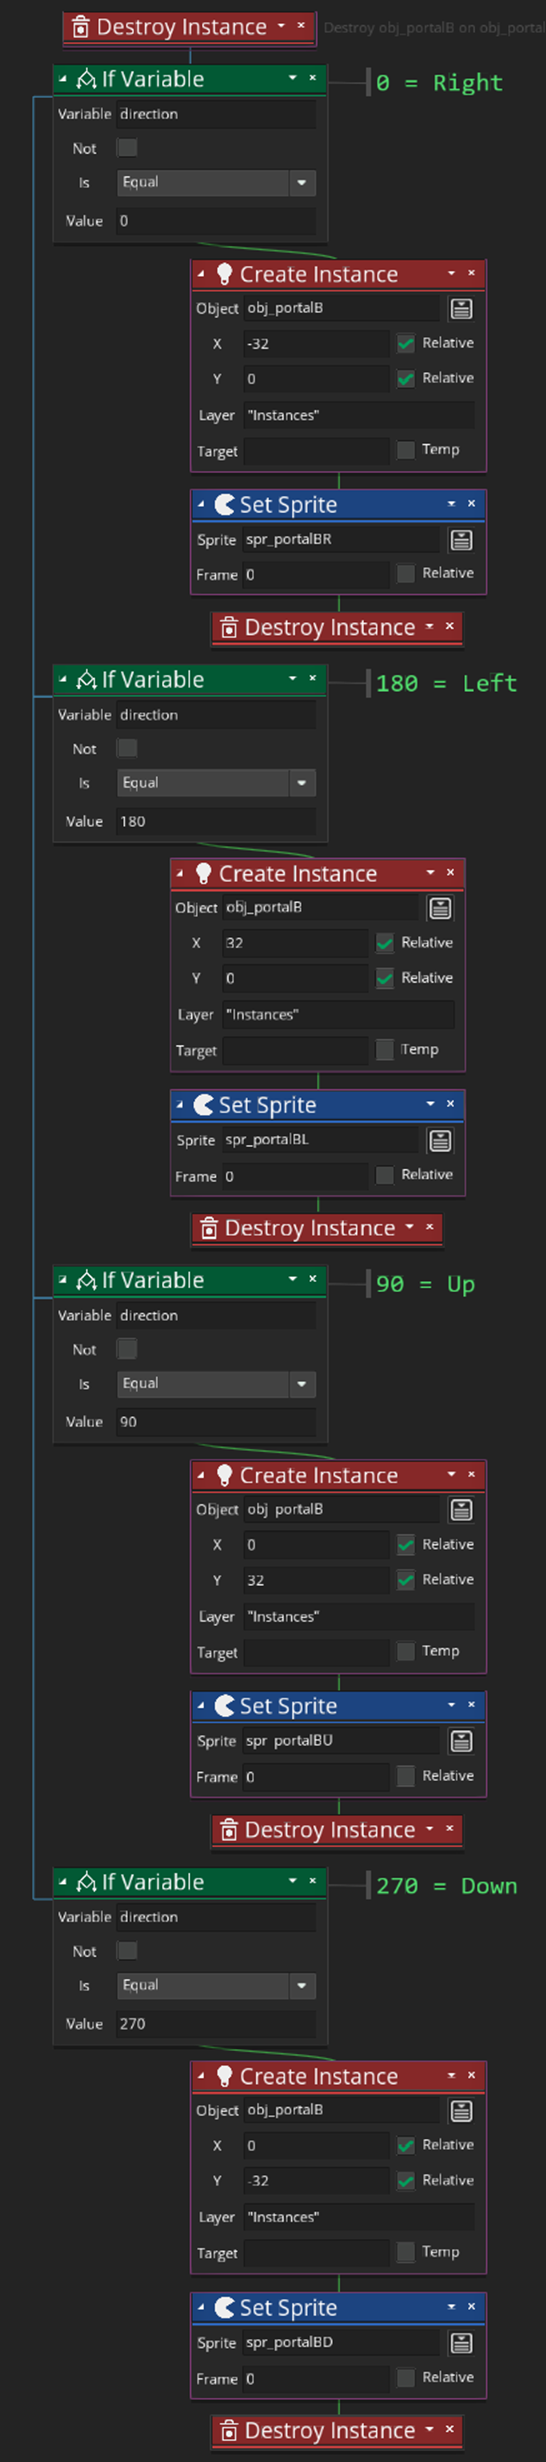
it is removed and a blue portal appears in the tile to the left of the wall. I11
– The If Variable action along with the three actions inside it needs to be
reproduced for each bullet direction.
Do so and refer to the image below if you need help.
TEST
ROOM – Your blue bullets now create portals (when they collide with walls)
when moving in all directions. I12 – Inside the orange bullet, add a
Collision > obj_wall event. If you go into the blue bullet’s collision event, you can hit CTRL-A to
select all actions and then right click on any action to choose a COPY
action. You can then go paste all of
those actions into the orange bullet’s collision event. Then, you have to slowly alter each action. TEST
ROOM – Your orange bullets now create portals (when they collide with walls)
when moving in all directions. J –
TELEPORTATION The challenge associated with teleporting
your character is that, when it touches a portal and is moved to the other
portal, it needs to appear close to the destination portal, but not on it (or
it would teleport back). To do this,
we need to determine how to offset the character when compared to the portal
and that will depend on the direction of the portal. J1 – Inside the blue bullet’s collision with
a wall, add the following action at the very bottom (not inside an if
statement): ·
Add an Assign
Variable action. o
Name: obj_portalB.direction o
Value: direction (this is the bullet’s direction) Explanation: This will store the value of the bullet’s direction
variable into the portal’s direction variable. Note that this is a bit of a hack because
the portal object will not be using direction to move in any way. So us setting the direction is just a way
to know which direction the portal is facing. J2 – Inside the orange bullet’s collision
with the wall, add the following action at the very bottom: ·
Add an Assign
Variable action. o
Name: obj_portalO.direction o
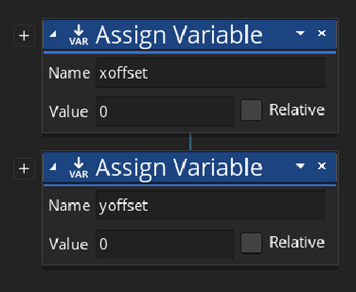
Value: direction J3 – Now inside the blue portal object, add
a Create event and add the following actions:
J4 – Repeat the previous step for the orange
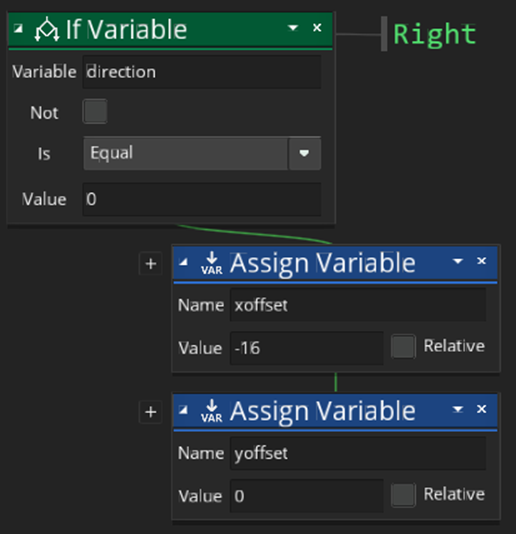
portal object. J6 - Place the following actions inside the
Step event.
Explanation: When the portal is on the right side of the tile, we want
to move the character to the left. So,
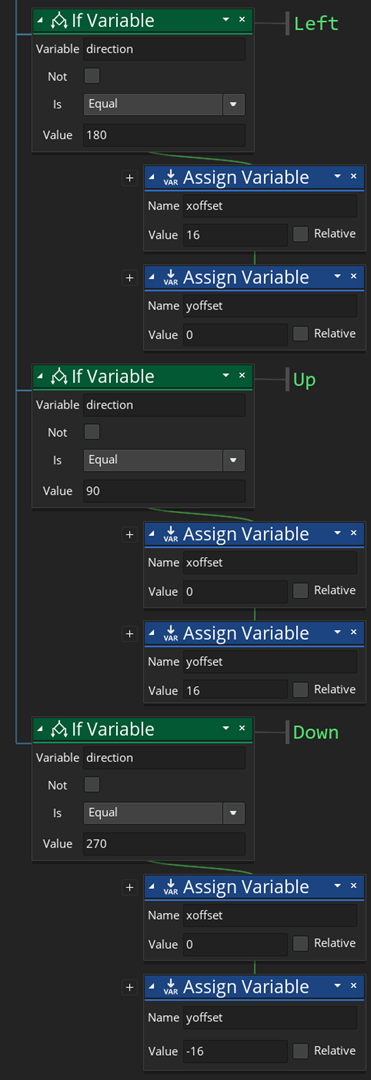
we set the xoffset to -16. J7 – Repeat the above for each of the other
directions (Left, Up, Down). Add this
below the above actions. See below.
J8 – Copy the entire Step Event and paste it
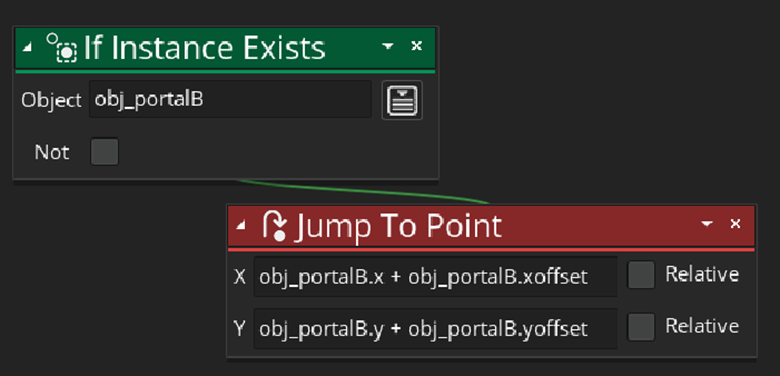
inside the orange portal object. J9 – Inside the Chell
object, add a collision with a blue portal event. J10 – Inside the above event, add the
following:
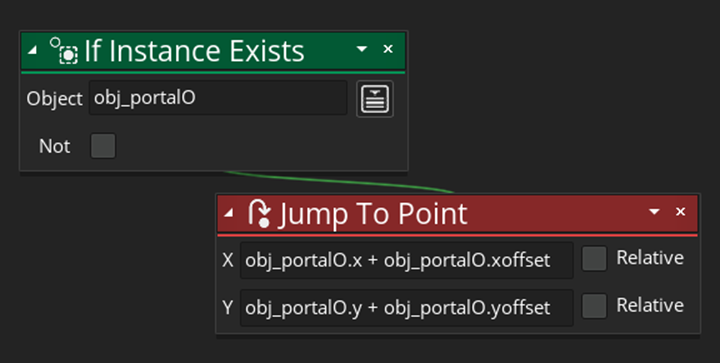
J11 – Inside the Chell
object, add a collision with the orange portal event. J12 – Inside the above event, add the
following:
TEST GAME – You should now be able to teleport between portals. K – WHAT’S
NEXT? |

Portal 2-D Game Maker game
- Create a room for testing the different features
- Give the player the ability to walk (I used arrow keys)
- Add walls and hazards(remember,
there are two types of walls)
- Add the portal gun(I started
with just the blue portal ball)
- Create a system that allows for an alternating portal
balls
- Add the orange portal balls
- Add the actual portals now(gray
non-portable, white portable)
- Create a system that teleports the user from the blue
portal to the orange portal(and vice-versa)
- Once the portal works, make the walls solid
- Ensure that the player does not get stuck in the walls
- Add the exit(I place an emancipation
grill on it, it doesn't do anything I just think it looks cool)
- Add the graphic at the bottom that changes based on the
last portal fired
(optional additions)
- Add the button that opens the door
- Make the door start closed
- Add the grate that prevents the player from passing but
not the portal ball
- Add the weighted cube and pressure plate
- Change the sprite to the orange variant based on the
last portal fired(I put this here because it only
changes 1 pixel)
(definitely optional)
- Add a tutorial mode that starts you with just one
portal and fires the orange one for you using the portal launcher
- Add the portal launcher
- Lasers and a reflective cube that changes the direction
of the laser relevant to the cube