|
GAME MAKER STUDIO TUTORIAL GAME MAKER 8
PART A – THE BASIC OBJECTS 1 – Creating basic character object · Resources > Create Sprite o Name: spr_person o
Load File: person.gif //DO NOT
CENTER YOUR SPRITES! · Object > Create Object o Name: obj_person o Pick corresponding sprite 2 – Creating basic goal object · Resources > Create Sprite o Name: spr_goal o
Load File: goal.gif · Object > Create Object o Name: obj_goal o Pick corresponding sprite 3 – Creating basic wall object · Resources > Create Sprite o Name: spr_wall o
Load file: wall.gif · Object > Create Object o Name: obj_wall o Pick corresponding sprite o Check the Solid box PART B – TWO BASIC ROOMS 1 – Adding our first room. · Resources > Create Room (after removing any existing room) · At the top, set: o Snap X: 32 o Snap Y: 32 · Add walls to your room to create a maze. (Keep it simple for now.) //SHIFT KEY is useful when clicking walls down · Add one person object and one goal object to your room. 2 – Adding a second room. · Resources > Create Room · At the top, set: o Snap X: 32 o Snap Y: 32 · Add walls to your room to create a maze. (Make it different then your first room.) · Add one person object and one goal object to your room. PART C – CHARACTER MOVEMENT 1 – Moving upwards · Inside the obj_person object, add a Keyboard event. o <UP> · Add a Move Fixed action (move tab) o Hit the upward arrow o Speed: 2 NOTE: Because the maze game involves your character
fitting into paths that are exactly the size of the grid (32 pixels), it is
important that your character line up with each grid square. To do this, its speed needs to be a factor
of 32. So, possible speeds are 2, 4,
8, 16 and 32. So, if the above speed
of 2 is too slow for you, use 4. 2 – Moving in other directions · Repeat the same steps as above for DOWN, LEFT and RIGHT movement. 3 – Stopping the movement · Add another Keyboard event o <No Key> · Add a Move Fixed action (move tab) o Hit the square in the middle which stands for ‘stop’. o Speed: 0 <Test game – Your character
should now move around the first room.> PART D – COLLISIONS 1 – Making the goal start the next level (room) · Inside the goal object, add a collision event. o obj_person · Add a Next Room action (main1 tab) <Test game – You should get to
the second room now after hitting the goal.
Game will crash if you hit goal in second room.> 2 – Colliding with wall · Inside the person object, add a Collision event. o obj_wall · Add a Moved Fixed action (move tab) o Select the stop button in the middle o Speed: 0 <Test game – You should no
longer be able to go through walls.> PART E – DIAMONDS & DOORS 1 – Creating the diamond object · Resources > Create Sprite o Name: spr_diamond o
Load File: diamond.gif //DO NOT CENTER
YOUR SPRITES! · Object > Create Object o Name: obj_diamond o Pick corresponding sprite 2- Creating the door object · Resources > Create Sprite o Name: spr_door o
Load File: door.gif //DO NOT
CENTER YOUR SPRITES! · Object > Create Object o Name: obj_door o Pick corresponding sprite o Check SOLID 3 – Making diamonds disappear (collision) · Inside the diamond object, add a Collision event. o Obj_person · Add a Destroy Instance action (main1 tab) o Self 4 – Making the door unpenetratable · Inside the person object, add a Collision event. o Obj_door · Add a Moved Fixed action (move tab) o Select the stop button in the middle o Speed: 0 5 – Making the door disappear when all diamonds are gone · Inside the door object, add a Step event. · Add a Test Instance Count action (control tab) o Object: obj_diamond o Number: 0 o Operation: Equal To · Add a Destroy Instance action (main1 tab) o Self <Test game – Place diamonds and
door in a room. Once all diamonds are
gone, door should disappear.> PART F – SCORE 1 – Adding score for diamonds · In the existing Collision event inside the diamond object, add a Set Score action (score tab) o New Score: 5 o Check Relative 2 – Add score for beating level · In the existing Collision event inside the goal object, add a Set Score action (score tab) o New Score: 50 o Check Relative <Test game – Score should go up
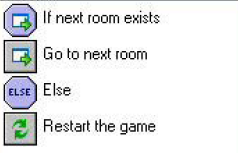
for every level you beat and for every diamond you collect.> PART G – THE END OF THE GAME (THE LAST ROOM) 1 – Dealing with the last room · Inside the Collision event of the goal object, add a Check Next action (main1 tab) · Place the above action first in your actions list. (drag it up) · Add an Else action (control tab) · Add a Restart Game action (main2 tab) //we will do more next step
<Test game – Your game should
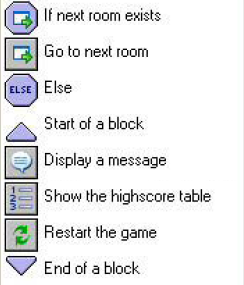
now restart when you beat the last room.> · Still in the Collision event of the goal object, add a Start Block action (control tab). · Place the Start Block action above the Restart the game action. · Add a Display Message action (main2 tab). o Message: You win! ·
Place the Display Message action above the
Restart the Game action. · Add a Show Highscore action (score tab). o Configure as you wish. · Pace the Show Highscore action above the Restart the Game action. · Add an End Block action (control tab)
<Test Game – Check if you get
message and high scores when you beat last room.> PART H – MONSTERS 1 – Creating basic monster object · Resources > Create Sprite o Name: spr_monster o
Load File: monster1.gif //DO NOT CENTER
YOUR SPRITES! · Object > Create Object o Name: obj_monster o Pick corresponding sprite 2 – Adding movement & bouncing off walls · Inside the monster object, add a Create event. · Add a Move Fixed action (move tab) o Pick desired direction(s). o
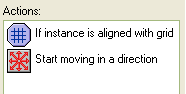
Pick a speed · Add a Collision event. o Obj_wall · Add a Bounce action (move tab) 3 – Dealing with collision with character · Still inside the monster object, add a Collision event. o Obj_person · Add a Destroy Instance action (main1 tab) o Other · Add a Show Highscore action (score tab) · Add a Restart Game action (main2 tab) PART I – PUTTING IT ALL TOGETHER · Using the person, goal, walls, diamonds, door and monsters, create 3 complete levels. PART J – IMPROVED PLAYER MOVEMENT (OPTIONAL) Have you noticed that navigation in the maze is sometimes a bit difficult? Here is an easy solution: · Do the following to every movement event (<Up>, <Down>, <Left>, <Right>, <No Key>) inside the person object: 1. Add a Check Grid action (control tab) o Snap hort: 32 o Snap vert: 32 2. Move this action above the Moved Fixed action. (see below)
· If your sprite is not exactly 32 x 32, your character might now be getting stuck on the walls and no longer be able to move. Here is the solution: 1. On your character’s sprite, uncheck Precise Collision Checking 2. On your character’s sprite, inside Modify Mask, under Bounding Box, pick Full Image. |