|
|
|
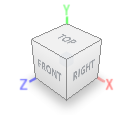
GETTING STARTED (DAY 1) These topics should be covered after the Fusion Installation has been completed. BASICS · Create a few 3D objects such as Box, Cylinder, Sphere & Torus. o Notice how a plane first needs to be selected before creating a object. · Look at the orbit tool. · Look at the pan tool. · Look at the zoom tool. The mouse wheel also conveniently zooms in and out. · At the top right of your screen, you will see a 3D cube that demonstrates the current orientation of your project. This is very useful and can be used to set a specific orientation.
· If you mouse over the cube (seen above), you will see a little home icon appear. Click on that icon will return you to the standard front-right-top view. · Close the drawing and do not save it (by pressing the small X). SKETCHES · To create 3D objects, we often need to start with a 2D shaped called a sketch. Once we have a closed off shape, we will be able to pull the shape into a 3D object. · Create a sketch together. · Talk about the plane selection. · See how the green Finish Sketch appears at the top right. This let’s you know that you are in a sketch. · Use the line tool to create a simple closed off shape. Notice that the shape turns a light blue colour when it is closed off. · Exit the sketch. · If you exit a sketch but need to go back to it, you can access it by finding it in the Sketches folder at the top left and double clicking the name. · Use Extrude to create a 3D object from your sketch. · Now create a new sketch, but this time on the surface of your object. · Proceed to show how you can add or remove from the object using Extrude. That’s it. You are ready to start your first drawing! |
|
TIMELINE At the bottom left of your screen, you will see the timeline.
It shows each of the steps you have done so far in your drawing. For example, in the timeline image shown above, we see that three steps have been done. First, a sketch was created, then Extrude was used and finally the Fillet command was used. We can go back in time by moving the playhead (far right dark grey symbol). We can either drag and drop it or use the playhead control buttons on the left. Going back in time allows us to see how our drawing looked after each step. Fusion also allows you to alter a step or add a new step. However, it is possible that changes will impact future steps. |
|
|