|
ARMATURE INSTRUCTIONS FROM PEER MENTOR NIKO TUTTLE (2024)
Blender version: 4.1
Status: Untested
1. Press 3 on the Number pad.
2. Create a Cylinder and scale it by pressing S, then Z to
make it longer.
3. Move the first cylinder to the side.
4. Duplicate the first cylinder by pressing Shift + D.
5. Rotate either cylinder to make it a 90-degree angle with
the other one.
6. Join them by pressing A to select all, then Ctrl + J to
join them.
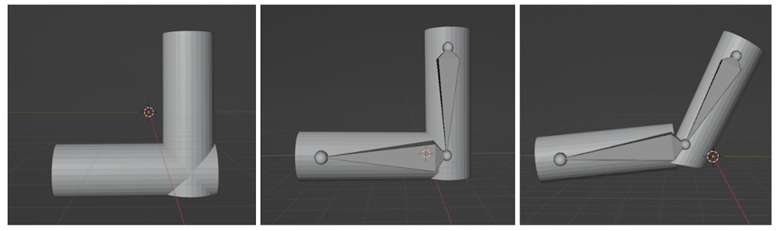
7. Go to the Add menu, find Armature, and click Single Bone.
8. On the right, go to Object Properties (the little orange
box) and click the Viewport Display menu, then toggle the “In Front”
button.
9. Scale the armature with S to around the same size as the
upright cylinder.
10. Rotate the armature so the skinny side is facing
downwards.
11. Select the armature and press Tab to go into Edit mode.
12. Click the little ball on the bottom, then press E to
extrude and stretch it to the end of the other cylinder.
13. Press Tab to get back into Object mode. Now press A, then
Ctrl + A, and select "All Transformations."
14. Hold Shift and left-click on the cylinders, then while
holding Shift, left-click on the armature.
15. Press Ctrl + P and click "With Automatic
Weights."
16. Now you can press Ctrl + Tab to go into Pose mode and move
around the armatures like an arm with the Rotate tool.
Original Video:
https://youtu.be/4z7G4TyKE9g?si=MyE_QriyjixJuscL
|