Unity Guide Part 1
So you wanna use Unity eh?
by Connor Killingbeck
I may be able to help. You may know me, you may not, but I will be your guide on some things. Mr.Campeau is skilled enough to answer most of your questions, but if he can’t check here. Should the solution not be here, Google and Youtube are your next best friends.
So let’s get started. Start a new unity Project using the 3D preset and let’s begin.
Volume 1: What is everything?
Before we start, here is a rundown:
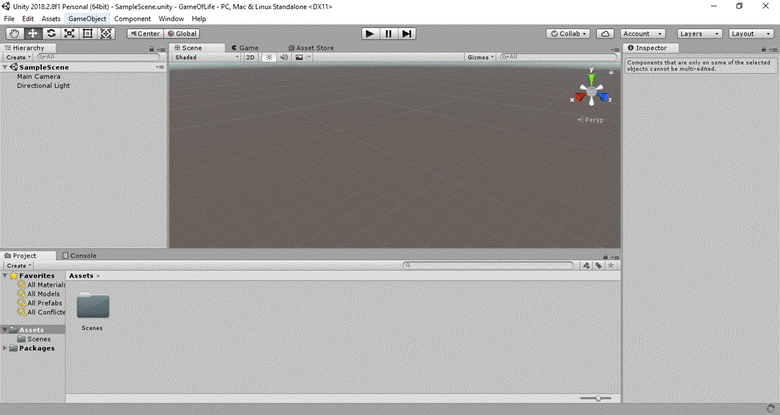
Scenes: You are currently in a Scene, which can be viewed as a room for your objects to be in. Scenes can be loaded and changed, this is how games often move you from one setting to another. Scenes can be saved and in Unity, will load how they were saved when they are called upon (For example, if you save a scene that has a red cube at [0,0,0], when the scene is loaded it will have a red cube at [0,0,0]). NOTE: Objects in the current scene WILL be deleted upon a scene change unless they are set to do otherwise.
Objects: Here they are, the items that make everything work. Objects come in MANY types, maybe a solid cube or even an invisible untouchable camera rendering the scene.
Components: In Unity, Components are attached to Objects to make them do things or give them characteristics. Components can be tweaked or turned off or on.
Scripts: Scripts are essentially custom Components that can be made. Scripts are files that you code in and then attach to an object. That code is then executed on the object.
1.1: The starter screen:
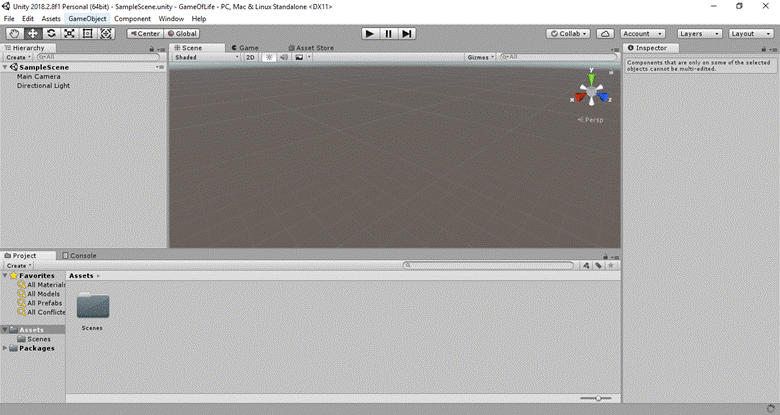
Here it is! The first screen you will ever see. Let’s break it down a little bit.
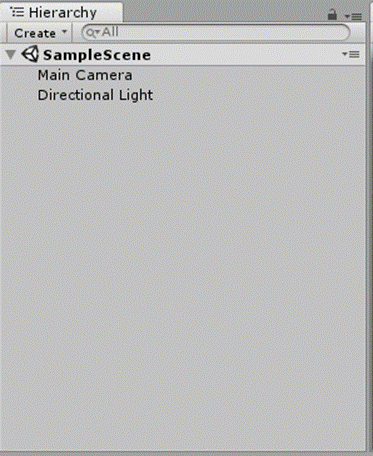
This is the Hierarchy. This is where you can see all the objects in your scene. Objects sometimes haVE CHILDREN, which are just other OBJECTS that revolve around their parents. We will talk about this later, but essentially all you need to know that everything in the hierarchy is in this scene. In the Hierarchy to start is the Main Camera, which will be where we see from, and a default Direction Light, which applies.....light.
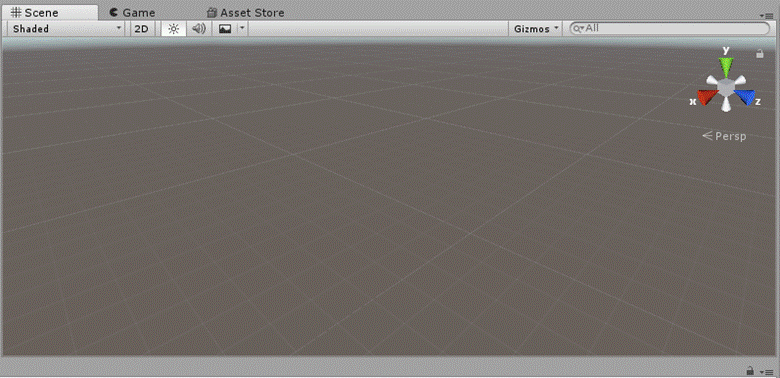
This is your scene! This is where you can move, rotate, and do all sorts of things with your objects. The tabs on top are to change the view of the scene, but for most of your work you will be in the scene view.

Finally is your ‘Library’. This is where your scripts and everything stays. When you apply them to a scene, say drag and drop, an exact copy of them is placed in the scene.
Alright, let’s do some work.
1.2 Creating Objects
Alright, first things first. Right Click on your hierarchy, then select 3D Object and then cube. This will create a cube on your screen!
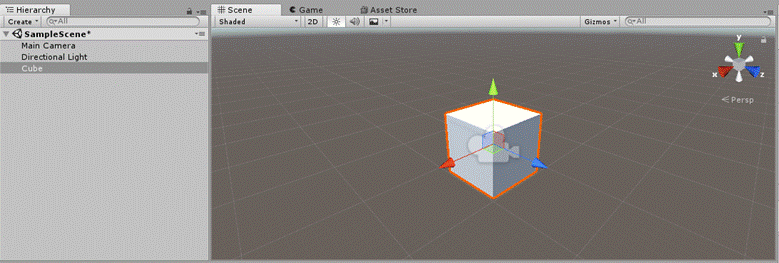
Alright thanks for watching like and subscribe.
In all seriousness, if we click on the cube, we can see its information on the right side in the inspector.
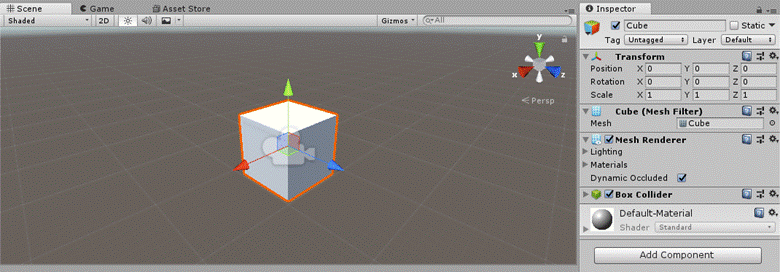
On the cube, we can see that it has a Transform Component, a mesh filter, a mesh renderer, and a box collider, as well as a Material. Here is a quick breakdown of each:
Transform: Where the object is in space, its rotation, and its scale
Mesh Filter: The objects mesh. This thing is rarely used. Ignore it for now
Mesh renderer: Controls if the object has lighting or is even rendered at all
Box Collider: Essentially a hit box in the shape of a cube
Material: Simply, The Color, can also be a skin/texture if you try hard enough
Now, if we press play, the cube will do.....NOTHING!
Notice that when we press the play button, we go to the Game tab, should you ever want to see the view of the game, go there to view it.
Now, lets make our Cube do something that we have all been doing since we were Children--; , Lets make the cube be affected by gravity.
1.3 Falling in love with Unity (I am NOT sorry)
While clicked on the cube, press the ADD
COMPONENT button.![]()
This will open up a drop down menu with a search bar, there is a lot to explore I know, but lets type ‘Rigidbody’ into the search bar. When it appears, click on it to add that component to our cube object!
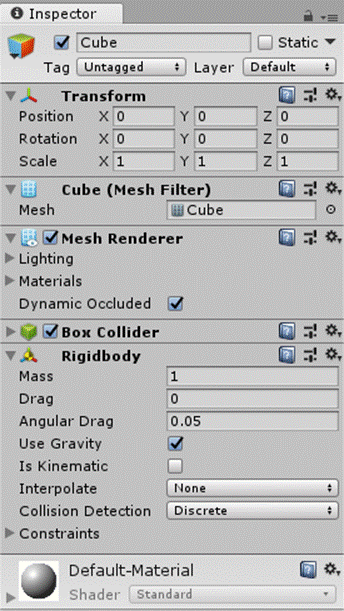
Now that the Rigidbody has been added, our cube will fall! Make sure Use Gravity is enabled and try playing the game, the cube should now fall. PURE OCTANE.
The Rigidbody is actually one of the most important components, it is the basis of all physics based actions, including collision. If 2 objects collide, one of them MUST have some sort of Rigidbody for the collision to actually occur.
Now that we have experienced Gravity yet again, lets make our block hit something.
1.4 Cubes Collide
Create a new cube in our scene. Set the Cube’s x and z scale to 10 in the cubes transform. Notice how the box collider (The green wired box) scales up with our object.
Now, if we run the game again, he should see our small box COLLIDE WITH THE BIGGER BOX, which is still more creative than anything Disney has released in the last year.
Now that we have out cube actually colliding with something, let's add some playability to our cube.
1.5 When you input it like that
Now, it’s time to make our little cube move. First things first is to right click on the library/assets section, select Create, and then C# Script. Name the script PlayerMove. Note that Unity gets very upset if you rename a script. Should you rename a script, you might have to open the script and change the class name to the new name.
To open the script, simply double click on it. It will take some time for Visual Studio (The Recommended script editor) to load. In my case, my toaster took 5 minutes.
*INHALES*. You smell that? That is the smell of a brand new script baby. Now you might be feeling confused, since were not in java anymore, so here is a quick rundown.
- Start(): Start is called first, from the very start, the premier, the OG. Note that start is only called once per object unless called again manually. Start() is called when an object is created.
- Update(): This function is very simple. Update is called once per frame for every object. This is usually where the bulk of your code is gonna go.
Alright, now lets get to coding. The first thing we are gonna do is set up some public variables.
Above the Start() function, we are going to create the following variables:
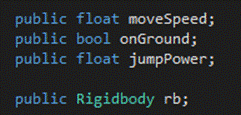
You may be wondering what these variables are, well, these are the public variables of the script. These variables can be accessed and changed by other objects, as well as seen and edited in the inspector for faster tweaking!
Now, as you can see we also have a public Rigidbody named rb. Unity allows you to get components and keep reference to them! This allows you to simply type “rb.” instead of manually getting the component every time! This can also be convenient if you have multiple of one component but only want to affect one of them.
Now, if we go back to our scene, we can apply our script. You can either select the object, in this case our little cube, and then press “Add Component”, or simply drag the script into the inspector.
You should now be able to see that we can edit and view our public variables!
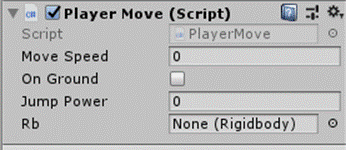
(NOTE: If the game is running, variable changes will not be saved!)
Alright, back to coding. Inside of our Update() function, we are going to put in our first line of code. In this line, we will check for an input, and then add force to our cube. Add the following lines of code:

“WHOA THERE HANDSOME COWBOY!” I hear none of you saying, and don't worry, I am way ahead of you.
- First things first is our if statement. In Unity, Input Handles input, you can do tons of different inputs, such as GetKeyDown, GetMouseButton, etc. “KeyCode” Contains the values of all the keys on your keyboard (most of the standard ones anyway). This if statement is essentially a true/false conditional statement. If it’s true that we are currently pressing “w”, then it’s going to execute. One final note is that GetKey is called for every frame the key is pushed down. We will use the method where Unity only detects presses on the keyboard soon.
- rb is our Rigidbody, and in this case, we want to Add a force to it. Force in Unity can be applied many ways, but in this specific case, the MASS of the Rigidbody will affect the force applied.
- transform.forward is very useful. Essentially, transform is accessing the objects transform component, and forward calculates with way is forward on the objects relative z axis, and then applies force to it in that direction. We will talk about this more later.
- Time.deltaTime is VERY VERY Important. Since things in unity are based off the frames, adding Time.deltaTime adds consistency to objects even at different frame rates. In this case, we are making the force being added change from being added per frame to being added per second.
- moveSpeed is our public variable from before, the higher it is the faster we move.
Now that we have added something for our Rigidbody to do, the next step is VERY important. For the rigidbody to work, we need to ADD A REFERENCE TO IT IN THE FIRST PLACE.
If we were to run our code now, we would get an error. Why? Because rb is equal to null! I have been leading you astray this whole time! This is a very simple fix however, in your Start() function, add the following line of code.

This is a common line of code. GetComponent gets the desired component, the name inside of the <> is the component in which you wish to grab. The reason I am making you use GetComponent instead of just dragging the component into the inspector is that Instantiated objects don't save dragged and dropped references, but GetComponent will remove this issue.
Now, since Unity’s friction system exists, we need to do a few other quick things. In the inspector on your Rigidbody, set angular drag to 0. Then, open up the constraints menu and freeze all rotations. This will remove all friction, as well as not let the cube rotate in any direction, allowing it to slide across the floor. There are better ways to do this, but that’s yours to explore!
So now, we can run our code. If we press play...OUR CUBE!!!! Does nothing. Make sure that you change your moveSpeed variable to something that is not negative or 0, or else nothing will happen since we are adding zero force.
There we go, our cube will go shooting off the screen. Since we are adding force, the longer we hold the button the faster the cube will go. You can change this by changing the type of force being applied, but for now we will stick with what we got.
Now is the part when you have to fill in the blanks yourself a little bit. Using the code above, change the code to make it so when we press D, we go right. Hint: Use transform.right instead of transform.up
If you are stuck, your code should look something like this:
if(Input.GetKey(KeyCode.D)
{
rb.AddForce(transform.right * Time.deltaTime * moveSpeed);
}
Now, say you were to try and make the A key move your cube move left, you will discover that there is no transform.left! That’s because moving left is just an illusion! Instead, you must move NEGATIVE transform.right. This is also true for transform.up and transform.forward, there is no opposite functions, so you simply add a negative in front to reverse direction.
Finally, use the above knowledge to make the cube move downward with s.
Now that our cube is moving, let’s make the camera follow it. There are many ways to do this, but since this is your first time, we are going to do it the fast, not so good way.
Simply click on the main camera in the hierarchy and drag it so that it is over your cube. This will cause the camera to become a child of your cube. The camera will now stay in its current position relative to the cube.
Before: ![]()
After: ![]()
After 9 whole pages, we were able to make one cube move along the other in one of the worst ways possible. BUT IT’S A START! From here, I encourage you to experiment and find better ways to do the things depicted here.