|
LESSON NOTE/GUIDE
|
|
THE
CODE public void setup() { //runs once } public void draw() { //loops forever } |
|
RESULT
|
|
EXPLANATION There is no main method. (The main method is hidden from us.) The setup()
method is automatically executed once. The draw()
method is automatically executed over and over. Try adding an output statement in
each method to see what happens. Note that an empty template still
creates a tiny window. (The code to
create the window is hidden from us.) |
PROGRAM
2 – HELLO WORLD
· This program demonstrates how to display Hello World
graphically in Processing.
|
THE
CODE public void setup() { fullScreen(); //escape to exit full screen textSize(100); text("hello
world", 650, 500); } public void draw() { } |
|
RESULT
|
|
EXPLANATION The fullScreen() call makes
the application fill the screen. You
need to hit escape to exit the full screen mode. Note that sometimes, you need to click
anywhere on the screen first and then hit the escape key. The textSize()
call sets the size of the text for any future text writing. The text()
call writes text to the window as (650, 500). |

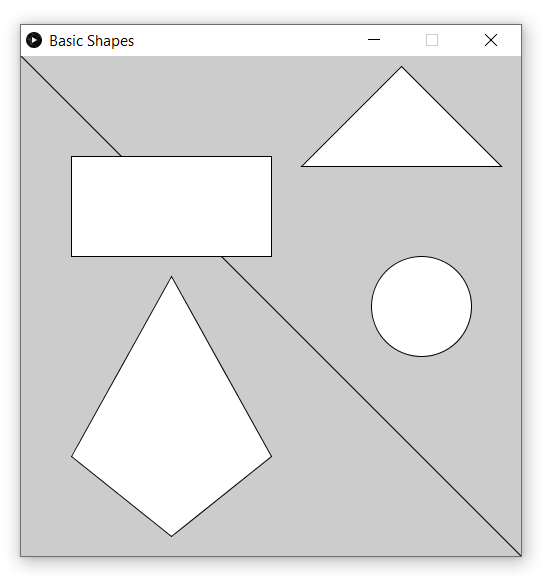
PROGRAM
3 – SIMPLE SHAPES
· This program demonstrates how to draw simple shapes
in Processing. Note that the top left
part of the screen is the origin (0, 0).
|
THE
CODE public void setup() { //window size & title size(500,500); surface.setTitle("Basic Shapes"); //basic shapes line(0,0,500,500); rect(50,100,200,100); ellipse(400,250,100,100); triangle(280,110,380,10,480,110); quad(50,400,150,220,250,400,150,480); } public void draw() { } |
|
RESULT
|
|
EXPLANATION Instead of creating a full screen
application, this time we created a window using the size()
method call. We also set the title
at the top of the window. The tools for creating basic shapes
are easy to use. The line method creates a line
between provided (x1, y1) and (x2, y2). The ellipse method creates an
ellipse centered on (x, y) with a given width and height. If the width and height are equal, then
the ellipse will be a circle. The rect
method creates a rectangle with the top left corner at (x, y) and a
specified width and height. The triangle method creates a
triangle with the three points (x1, y1), (x2, y2) and (x3, y3). The quad method creates a
quadrilateral with the four points (x1, y1), (x2, y2), (x3, y3) and (x4, y4). |
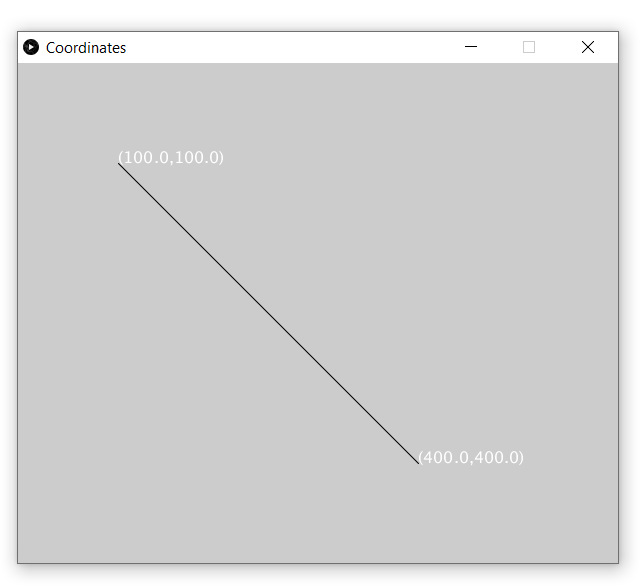
PROGRAM
4 – EXPLORING COORDINATES
· This program allows the user to explore the
coordinate system.
|
THE
CODE public void setup() { //window size &
title size(600,500); surface.setTitle("Coordinates"); //line coordinates
(TRY CHANGING THEM) float x1 = 100; float y1 = 100; float x2 = 400; float y2 = 400; //outputs line and
text to screen line(x1,y1,x2,y2); textSize(16); text("("+x1+","+y1+")",x1,y1); text("("+x2+","+y2+")",x2,y2); } public void draw() { } |
|
RESULT
|
|
EXPLANATION In the program, the user is
encouraged to change the value of the variables x1, y1, x2 and y2 and try
running the program. This should
help the user understand how the coordinate system works. |
PROGRAM
5 – COLOURS
·
This program
shows how to change colours in the Procession focusing on the background of
the window as well as the stroke and the fill of shapes.
·
Students should
look up how RGB colours work.
|
THE
CODE public void setup() { //window size &
title size(800,200); surface.setTitle("Colours"); background(128,0,128); stroke(255,0,0); //red fill(0,255,0); //green ellipse(100,100,200,200); stroke(0,0,255); //blue fill(128,128,128);
//gray ellipse(300,100,200,200); noStroke(); //no stroke fill(255,255,255); //white ellipse(500,100,200,200); stroke(0,0,0); noFill(); ellipse(700,100,200,200); } public void draw() { } |
|
RESULT
|
|
EXPLANATION RGB, short for Red Green Blue, is
the most common colour system used in computer
applications. It consists of
providing an amount (between 0 and 255) for red, green and blue which gets
combined to create a colour. A simple Google search for RGB colours
will lead one to many colour picking tools. Here is a list of common colours: Black 0, 0, 0 Gray 128, 128, 128 White 255, 255, 255 Red 255,
0, 0 Green 0, 255, 0 Blue 0, 0, 255 The background statement in code
sets the background colour. It will erase anything that is drawn
before it. Processing allows the user to
provide a colour for the outline of shapes called
stroke. It also allows the user to
set the colour of the fill in a shape. The functions are stroke and fill. Also, if you want to specify that
there should be no stroke, you use noStroke(). Similar, to
set no fill, you use noFill(). |

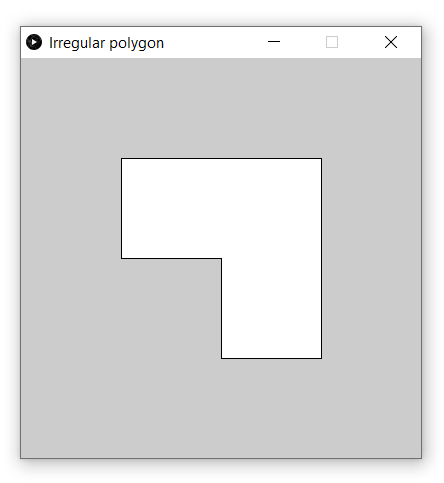
PROGRAM
6 – IRREGULAR POLYGONS
· This program shows how to use the beginShape, vertex and endShape
methods to create any regular polygon.
|
THE
CODE public void setup() { size(400,400); surface.setTitle("Irregular polygon"); beginShape(); vertex(100,100); vertex(100,200); vertex(200,200); vertex(200,300); vertex(300,300); vertex(300,100); endShape(CLOSE); } public void draw() { } |
|
RESULT
|
|
EXPLANATION Creating any polygon is fairly
simple. We simply use beginShape and endShape
methods. In between the two calls,
we use vertex(x,y)
several times to create each point in the polygon. |
PROGRAM
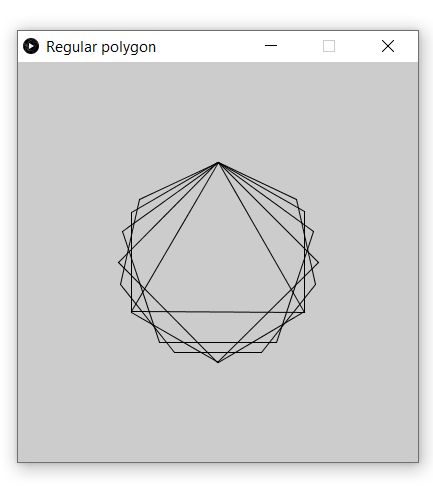
7 – REGULAR POLYGONS
·
This program
shows how to draw any regular polygon.
·
This program uses
a polygon method that was adapted from the processing.org help files. To use the code in the setup method, you
need to also have the polygon method at the bottom.
·
The one
limitation of the polygon method is that the first point in the polygon is
always directly above its center point.
|
THE
CODE public void setup() { size(400,400); surface.setTitle("Regular polygon"); noFill(); polygon(200,200,100,3); polygon(200,200,100,4); polygon(200,200,100,5); polygon(200,200,100,6); polygon(200,200,100,7); } public void draw() { } //The following is a method that can be used to draw regular //polygons. It is
very similar to the polygon method that is //found in the processing.org
help files under Regular Polygon. void polygon(float x, float y,
float radius, int npoints) { float angle = TWO_PI
/ npoints; beginShape(); for (float a =
3*TWO_PI/4; a < TWO_PI+3*TWO_PI/4; a += angle) { float sx = x + cos(a) * radius; float sy = y + sin(a) * radius; vertex(sx, sy); } endShape(CLOSE); } |
|
RESULT
|
|
EXPLANATION The polygon method at the bottom of
the code gets a center point at (x,y),
a radius for the polygon and the number of points in the polygon (ie: 5 points is a pentagon). Understanding how it works requires an
understanding of trigonometry and radian angles and is beyond the scope of
this lesson. The program in the setup method
uses the polygon method to create a triangle, square, pentagon, hexagon and
heptagon all centered on (200, 200).
|