G4P IN PROCESSING
LESSON 01 – GETTING STARTED WITH
GUIs
LESSON NOTE/GUIDE
WHAT
IS G4P?
G4P stands for GUIs for Processing. It is a library that provides you with
access to GUI design classes such as common controls like buttons, text
fields and drop down menus.
INSTALLING
SOFTWARE
·
You can easily
install this library from inside Processing.
·
Go to Sketch
> Import Library > Add Library and then scroll down to G4P and hit
Install.
PROGRAM
1 – A FEW BASIC CONTROLS
· This program demonstrates how to add a button, text
field and text area to a Processing application. Also, notice the import statement that is
required!
|
THE
CODE
import g4p_controls.*;
public void setup()
{
size(300,200);
surface.setTitle("Simple GUI
controls");
GButton
b = new GButton(this,10,10,100,50,"Hello");
GTextField
tf = new GTextField(this,120,10,100,20);
GTextArea
ta = new GTextArea(this,120,40,100,100);
}
public void draw()
{}
|
|
RESULT
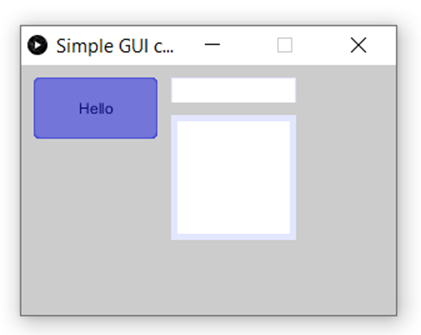
Note that the
controls above do not do anything yet.
Clicking the button will do nothing.
Typing in the text field or the text area will allow text to appear
in them but that is all.
|
|
EXPLANATION
First, the import statement is
necessary to use G4P classes such as GButton, GTextField and GTextArea.
Inside setup(),
our focus is on the last three lines that create GUI controls. All three of these lines create a control
object. For all of them, the first
parameter is this, which simply means that the control will be added to
this window. The next four
parameters represent the x, y, width and height of the control. The GButton
requires one more parameter for the text that appears on the button.
Try it out!
|
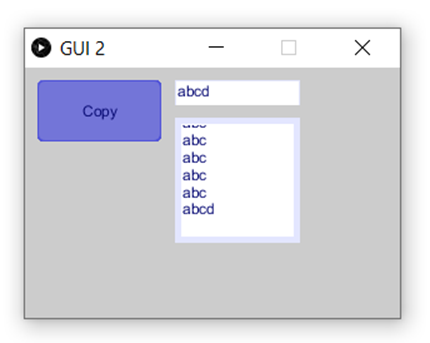
PROGRAM
2 – INTERACTIVE BUTTON
· This program demonstrates how to make a button
control your application. This is
event driven programming. The code in
green shows what is different from the first program.
|
THE
CODE
//instance
variables
public
GButton b;
public
GTextField tf;
public
GTextArea ta;
public
void setup()
{
size(300,200);
surface.setTitle("GUI
2");
b
= new GButton(this,10,10,100,50,"Copy");
tf = new GTextField(this, 120,
10, 100, 20);
tf.setText("abc");
ta =
new GTextArea(this, 120, 40, 100, 100);
}
public
void draw()
{}
public
void handleButtonEvents(GButton button, GEvent event)
{
String s = tf.getText();
ta.appendText(s);
}
|
|
RESULT
|
|
EXPLANATION
At the top, we declare data fields
(instance variables) for each of the controls in our GUI. This is needed if we want to access the
controls in different methods in the program. We need this now because we need to
access the controls in the handleButtonEvents(..)
method.
Now, inside setup(),
it is important that we not declare the controls when we construct them.
Still inside setup(),
we use the setText() method from GTextField to set the text inside the text field to “abc”.
Now, to react to when a button is
clicked, we need to include the method:
handleButtonEvents(GButton button, GEvent event)
This method is automatically called
everytime a button is clicked. Inside it, we simply get the text in the
text field and append it into the text area.
|
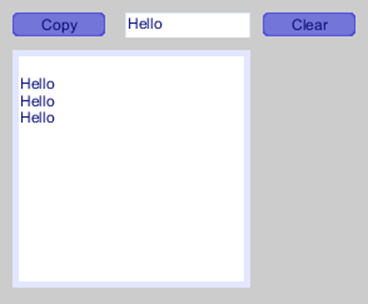
PROGRAM
3 – TWO BUTTONS
·
This program
demonstrates how to have two buttons do different things in the code.
|
THE
CODE
import
g4p_controls.*;
//Instance
variables (all controls)
public
GButton but;
public
GButton but2;
public
GTextField tf;
public
GTextArea ta;
public
void setup()
//serves as a constructor in a way
{
fullScreen();
but = new GButton(this, 10, 10,
75, 20, "Copy");
tf = new GTextField(this,
100, 10, 100, 20);
tf.setText("Hello");
ta = new GTextArea(this, 10, 40,
190, 190);
but2 = new GButton(this, 210, 10,
75, 20, "Clear");
}
public
void draw()
{}
public
void handleButtonEvents(GButton clickedButton,
GEvent event)
{
if(clickedButton == but)
{
String s = tf.getText();
ta.appendText(s);
}
else if (clickedButton
== but2)
{
ta.setText("");
}
}
|
|
RESULT
|
|
EXPLANATION
The only new concept in this
program is that there are now two buttons.
When the Copy button is clicked, we want to make the program copy
the text field into the text area.
When the Clear button is clicked, we want to clear the text
area.
We do this by using a simple if
statement inside the handleButtonEvents method. The GButton
parameter (named clickedButton above) is a
reference to the button that was clicked on by the mouse.
So, we can easily check which
button was clicked and respond accordingly.
|
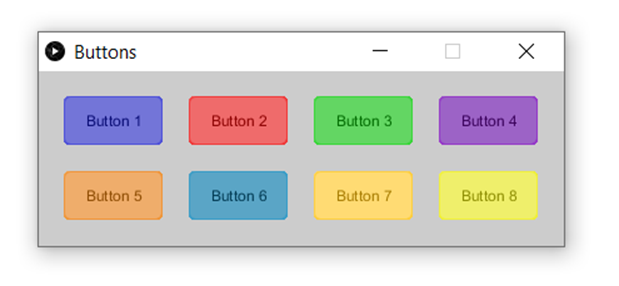
PROGRAM
4 – COLOURS
·
This program
demonstrates how to change the colours of the components. While the example only shows buttons, the
color statements work on other types of components as well.
|
THE
CODE
import
g4p_controls.*;
public
GButton but01, but02, but03, but04;
public
GButton but05, but06, but07, but08;
public
void setup()
{
surface.setSize(420,
140);
surface.setTitle("Buttons");
but01 = new GButton(this, 20, 20,
80, 40, "Button 1");
but02 = new GButton(this, 120, 20,
80, 40, "Button 2");
but02.setLocalColorScheme(GCScheme.RED_SCHEME);
but03 = new GButton(this, 220, 20,
80, 40, "Button 3");
but03.setLocalColorScheme(GCScheme.GREEN_SCHEME);
but04 = new GButton(this, 320, 20,
80, 40, "Button 4");
but04.setLocalColorScheme(GCScheme.PURPLE_SCHEME);
but05 = new GButton(this, 20, 80,
80, 40, "Button 5");
but05.setLocalColorScheme(GCScheme.ORANGE_SCHEME);
but06 = new GButton(this, 120, 80,
80, 40, "Button 6");
but06.setLocalColorScheme(GCScheme.CYAN_SCHEME);
but07 = new GButton(this, 220, 80,
80, 40, "Button 7");
but07.setLocalColorScheme(GCScheme.GOLD_SCHEME);
but08 = new GButton(this, 320, 80,
80, 40, "Button 8");
but08.setLocalColorScheme(GCScheme.YELLOW_SCHEME);
}
public
void draw()
{
}
public
void handleButtonEvents(GButton clickedButton,
GEvent event)
{
clickedButton.setLocalColorScheme(GCScheme.BLUE_SCHEME);
}
|
|
RESULT
|
|
EXPLANATION
The above code creates eight
buttons all of different colours.
Notice that the first button uses the default colour,
which is blue.
When a button is clicked, it turned
blue.
|
Q & A
How do I check if a button is clicked, released or
pressed?
You can check the event type by doing something like below:
void handleButtonEvents(void handleButtonEvents(GButton button, GEvent event) { if(button == btnName && event == GEvent.CLICKED) { // code for button click event } }
How do I get or set the text of a button?
You use the setText() and getText() methods.
How do I disable a button (but leave it on the screen)?
To disable a button, use:
buttonName.setEnabled(false);
To enable a button, use:
buttonName.setEnabled(true);
How do I hide a button?
To hide a button, use:
buttonName.setVisible(false);
To unhide a button, use:
buttonName.setVisible(true);
How do I use an image as a button?
The GImageButton component allows you to create
buttons out of existing images. This
component allows you to provide between 1 and 3 image filenames in a String
array. The first image file is the
regular button. The second is the
button when the mouse is over it. The
third image file is the button when the button is clicked on.
GImageButton
but01;
String[]
fnames = {"button01.png",
"button01over.png", "button01down.png"};
but01 = new GImageButton(this,
426, 241, fnames);
How can I handle an event related to a GTextField?
Simply use the method below.
Note that this method is executed if you click on the textfield and every time you add a character to the text
field.
public void handleTextEvents(GEditableTextControl etc, GEvent event)
{
System.out.println("Hi");
}
|