Java Swing - Graphics
TOPIC 05 –
IMAGE FILES PIXEL BY PIXEL


LESSON NOTE


PIXEL


Images can be broken down into small dots called pixels.  Each pixel has a single colour. 


MEGAPIXEL


The word megapixel means “millions of pixels”.  A 12 megapixel camera takes images that consist of about 12 million pixels.

PIXEL COORDINATES


Each pixel has a coordinate.  The top left pixel is at (0,0).  The one to the next of it is at (0,1).  The one beneath (0,0) is at (0,1).


This is the same system used as when we are drawing shapes on a canvas so we won’t spend anymore time on this idea.


SETTING A PIXEL’S COLOUR


This is fairly simple.  First we create a color object.  Then we specify which pixel is to get that colour.


Color c = new Color(214, 183, 101);

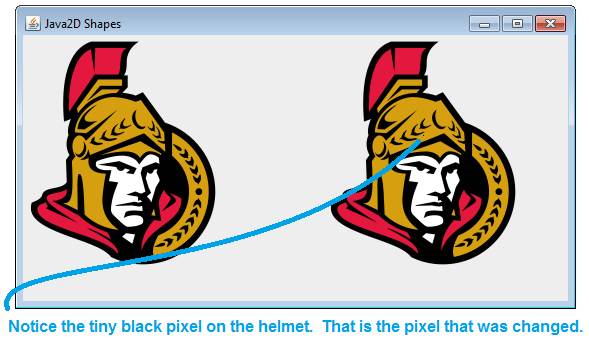
            img.setRGB(x,y,c.getRGB());


EXAMPLE – SETTING A PIXEL’S COLOUR


import javax.swing.JFrame;


public class ImagePixelSetTester

{

          public static void main(String[] args)

          {

                 JFrame jf = new JFrame();               

                 jf.setSize(600,400);

                 jf.setVisible(true);

                 jf.setTitle("Java2D Shapes");  


                 //Create my panel and add it to JFrame object

                 ImagePixelSetPanel pan = new ImagePixelSetPanel();

                 jf.add(pan);

          }

}

import java.awt.Color;

import java.awt.Graphics;

import java.awt.Graphics2D;

import java.awt.Image;

import java.awt.geom.AffineTransform;

import java.awt.image.BufferedImage;

import java.io.File;

import java.io.IOException;

import java.net.URL;


import javax.imageio.ImageIO;

import javax.swing.ImageIcon;

import javax.swing.JPanel;


public class ImagePixelSetPanel extends JPanel

{

   public void paint(Graphics g)

   {


       Graphics2D g2D = (Graphics2D)g;


       //==================================================

       //PART 1 - GET IMAGE FROM MEMORY & DISPLAY IT (LEFT)

       //==================================================


       BufferedImage img = null;

       try

       {

          img = ImageIO.read(new File("sensLogo.png"));  //in project folder

          g2D.drawImage(img, 0, 0, null);

       }   

       catch (IOException e)

       {

          System.out.println("Error");

          e.printStackTrace();

       }


       //=====================================================

       //PART 2 - CHANGE A SINGLE PIXEL AND DISPLAY IT (RIGHT)

       //=====================================================


       Color c = Color.black;

       img.setRGB(100,100,c.getRGB());  //make pixel at (100,100) black

       g2D.drawImage(img, 300, 0, null);   

   }

}


The code above creates the following:


GETTING A PIXEL’S COLOUR


Let’s assume we have a BufferedImage object called img.


We can get an encoded RGB value (integer) for a specific pixel by using:


     img.getRGB(x,y)


Where x and y are the coordinates of the pixel.


However, working with an encoded RGB value is a pain.  Thankfully, we can convert that to a Color object by using the following constructor:


     Color(int RGBValue, boolean hasAlpha)


Combining everything, we get the following statement:


     Color pixelColor = new Color(img.getRGB(x,y), true);


PIXEL BY PIXEL MANIPULATION


Using nested for loops, you can loop through each pixel of an image.  The template looks like this:


     for(int x = 0; x < img.getWidth(); x++)

     {

        for (int y = 0; y < img.getHeight(); y++)

        {

           //Get the colour of the pixel at (x,y) here


           //Figure out a new colour for that pixel


           //Set the new colour of the pixel at (x,y) here

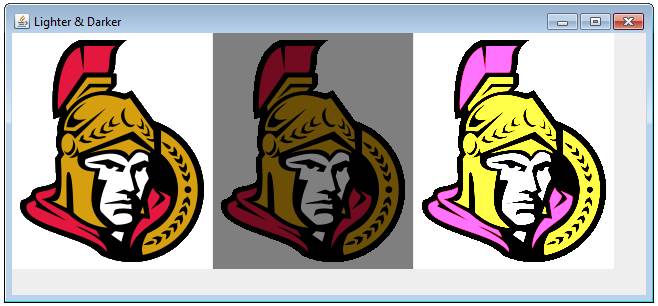
        }

     }


EXAMPLE 1 – MAKING AN IMAGE LIGHTER & DARKER


The following code will go through an image pixel by pixel and create a darker and lighter version of that image.


import javax.swing.JFrame;


import Java2DStuff.Java2DPanel;


public class ImageLighterDarkerTester

{

   public static void main(String[] args)

   {

          JFrame jf = new JFrame();               

          jf.setSize(650,300);

          jf.setVisible(true);

          jf.setTitle("Lighter & Darker");  


          //Create my panel and add it to JFrame object

          ImageLighterDarkerPanel pan = new ImageLighterDarkerPanel();

          jf.add(pan);

   }

}


import java.awt.Color;

import java.awt.Graphics;

import java.awt.Graphics2D;

import java.awt.Image;

import java.awt.geom.AffineTransform;

import java.awt.image.BufferedImage;

import java.io.File;

import java.io.IOException;

import java.net.URL;


import javax.imageio.ImageIO;

import javax.swing.ImageIcon;

import javax.swing.JPanel;


public class ImageLighterDarkerPanel extends JPanel

{

   public void paint(Graphics g)

   {

       Graphics2D g2D = (Graphics2D)g;


          //=============================================

       //1-GET IMAGE FROM MEMORY

          //=============================================


       BufferedImage img = null;

          try

         {

                 img = ImageIO.read(new File("sensLogo.png"));  //img in project folder

         }   

          catch (IOException e)

          {

                 System.out.println("Error");

                 e.printStackTrace();

          }


          //=============================================

          //2-DRAW ORIGINAL IMAGE (LEFT)

          //=============================================


       g2D.drawImage(img, 0, 0, null);


          //==========================================================

       //3-CHANGE THE IMAGE TO MAKE IT DARKER (ONE PIXEL AT A TIME)

          //==========================================================


       for(int y=0; y < img.getHeight(); y++)

       {

          for (int x=0; x < img.getWidth(); x++)

          {

              Color oldCol = new Color(img.getRGB(x,y), true);


              int newRed = oldCol.getRed() / 2;      //darker red

              int newGreen = oldCol.getGreen() / 2;  //darker green

              int newBlue = oldCol.getBlue() / 2;    //darker blue

              Color newCol = new Color(newRed, newGreen, newBlue);


              img.setRGB(x,y,newCol.getRGB());

          }     

       }  


          //=============================================

       //4-DISPLAY NEW VERSION OF IMAGE (MIDDLE)

          //=============================================


       g2D.drawImage(img,201,0,null);


          //==========================================================

       //5-GET THE IMAGE FROM MEMORY AGAIN

          //==========================================================


          try

          {

                 img = ImageIO.read(new File("sensLogo.png"));  //img in project folder (Eclipse)

       }   

          catch (IOException e)

          {

                 System.out.println("Error");

                 e.printStackTrace();

          }


          //==========================================================

       //6-CHANGE THE IMAGE TO MAKE IT DARKER (ONE PIXEL AT A TIME)

          //==========================================================


       for(int y=0; y < img.getHeight(); y++)

       {

          for (int x=0; x < img.getWidth(); x++)

          {

              Color oldCol = new Color(img.getRGB(x,y), true);


              int newRed = Math.min (oldCol.getRed() * 5, 255);      //lighter red, no more than 255

              int newGreen = Math.min(oldCol.getGreen() * 5, 255);  //lighter green, no more than 255

              int newBlue = Math.min(oldCol.getBlue() * 5, 255);    //lighter blue, no more than 255

              Color newCol = new Color(newRed, newGreen, newBlue);


              img.setRGB(x,y,newCol.getRGB());

          }     

       }  


       //=============================================

       //7-DISPLAY NEW VERSION OF IMAGE (MIDDLE)

       //=============================================


       g2D.drawImage(img,402,0,null);


   }

}


The code above will create


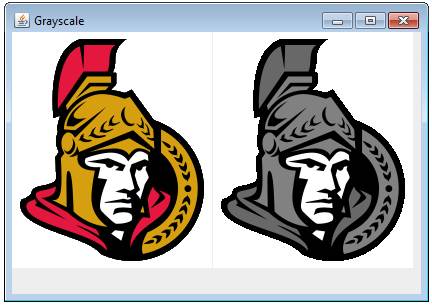
EXAMPLE 2 – GRAYSCALE


In this example, we will alter an image’s pixels so that the image is grayscale instead of full colour.


import javax.swing.JFrame;

import Java2DStuff.Java2DPanel;


public class ImageGrayscaleTester

{

   public static void main(String[] args)

   {

          JFrame jf = new JFrame();               

          jf.setSize(425,300);

          jf.setVisible(true);

          jf.setTitle("Grayscale");  


          //Create my panel and add it to JFrame object

          ImageGrayscalePanel pan = new ImageGrayscalePanel();

          jf.add(pan);

   }

}

import java.awt.Color;

import java.awt.Graphics;

import java.awt.Graphics2D;

import java.awt.Image;

import java.awt.geom.AffineTransform;

import java.awt.image.BufferedImage;

import java.io.File;

import java.io.IOException;

import java.net.URL;


import javax.imageio.ImageIO;

import javax.swing.ImageIcon;

import javax.swing.JPanel;


public class ImageGrayscalePanel extends JPanel

{

   public void paint(Graphics g)

   {

       Graphics2D g2D = (Graphics2D)g;


          //=============================================

       //1-GET IMAGE FROM MEMORY

          //=============================================


       BufferedImage img = null;

          try

          {

                 img = ImageIO.read(new File("sensLogo.png"));  //img in project folder (Eclipse)

       }   

          catch (IOException e)

          {

                 System.out.println("Error");

                 e.printStackTrace();

          }


          //=============================================

          //2-DRAW ORIGINAL IMAGE (LEFT)

          //=============================================


       g2D.drawImage(img, 0, 0, null);


        //==========================================================

       //3-CHANGE THE IMAGE TO MAKE IT GRAYSCALE

       //  We do this by adding the amount of red, green and blue.

       //  We then divide that total by 3 and setting all three

       //  colours to that number.  NOte that gray is created when

       //  all three r, g and b are the same.

       //==========================================================


       for(int y=0; y < img.getHeight(); y++)

       {

          for (int x=0; x < img.getWidth(); x++)

          {

              Color oldCol = new Color(img.getRGB(x,y), true);


              int total = oldCol.getRed() + oldCol.getGreen() + oldCol.getBlue();

              int average = total / 3;


              Color newCol = new Color(average, average, average);


              img.setRGB(x,y,newCol.getRGB());

          }     

       }


          //=============================================

       //4-DISPLAY NEW VERSION OF IMAGE (MIDDLE)

          //=============================================


       g2D.drawImage(img,201,0,null);

   }

}


The above code will create: