|
Java
Swing - Graphics
TOPIC 01 – SIMPLE GRAPHICS

LESSON NOTE
JFRAME
The
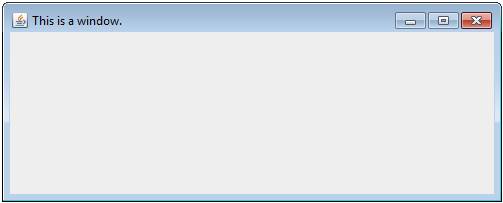
JFrame class allows you to create JFrame objects. A JFrame is simply a window that can be drawn onto.
Consider
the following code:
|
import javax.swing.JFrame;
public class JFrameTest
{
public static void
main(String[] args)
{
JFrame jf = new JFrame();
jf.setSize(500,200);
jf.setTitle("This is a window.");
jf.setVisible(true);
}
}
|
It creates the following window:
JPANEL
A JPanel object is an object that can be drawn onto. We will also see more uses for it
later.
A JPanel object can be added to a JFrame. We can add many JPanel
objects to JFrame.
More on this later.
EXTENDING JPANEL
In order to get the full functionality of the JPanel, we will create our own class that extends the JPanel class. This
will provide the class that we create with the same functionality as the JPanel class. We
will simply add to that functionality by overriding the JPanel’s
paint method.
PAINT METHOD
The paint method is automatically called in the background whenever the
window needs to be repainted. By
overriding the version that is in the basic JPanel,
we ensure that it is our paint
method that automatically gets called.
The paint method has a Graphics object as parameter. We can draw and paint to that Graphics
object.
EXAMPLE
Consider the following code that consists of two classes (two
files):
|
//filename:
MyPanelTester.java
import javax.swing.JFrame;
public class MyPanelTester
{
public static void
main(String[] args)
{
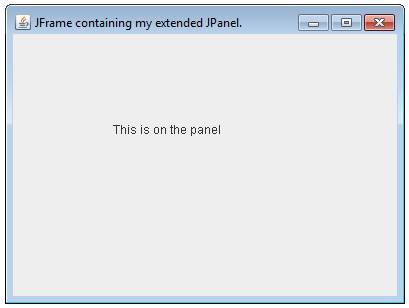
//Create a JFrame object.
JFrame jf = new JFrame();
jf.setSize(400,300);
jf.setVisible(true);
jf.setTitle("JFrame
containing my extended JPanel.");
//Create a MyPanel object and add it to JFrame
object
MyPanel pan = new MyPanel();
jf.add(pan);
}
}
|
|
//filename:
MyPanel.java
import java.awt.Graphics;
import javax.swing.JPanel;
public class MyPanel extends JPanel
{
public void
paint(Graphics g)
{
//Write
a msg on the
panel.
g.drawString("This
is on the panel", 100, 100);
}
}
|
The program above will create:
COORDINATES
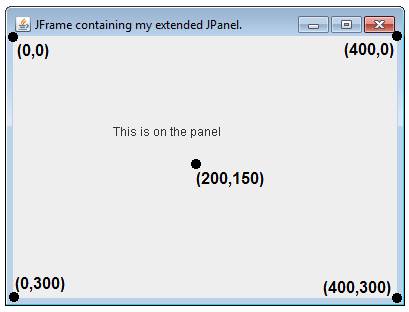
To
be able to understand how to draw shapes on a JPanel,
we need to understand the coordinate system in use. The top left of the Panel is (0,0). The x-axis
increases to the right direction. The
y-axis increases in the downward direction.
Consider
the JFrame that is size to hold a JPanel that is 400 wide by 300 high. The image below shows key coordinate point
locations.
PAINTING MORE THINGS
Using the example above, we only need to change the paint method
inside the MyPanel class in order to change what is
being painted.
EXAMPLE
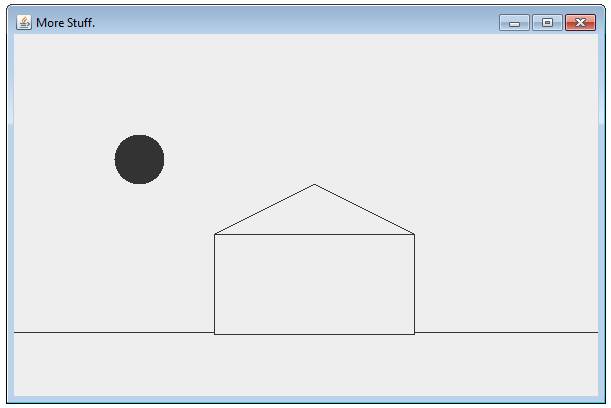
The
example is the same as the above with additional graphical shapes added in
the MyPanel class.
|
import javax.swing.JFrame;
public class MyPanelTester
{
public static void
main(String[] args)
{
JFrame jf = new JFrame();
jf.setSize(600,400);
jf.setVisible(true);
jf.setTitle("More stuff.");
//Create my
panel and add it to JFrame object
MyPanel pan
= new MyPanel();
jf.add(pan);
}
}
|
|
import java.awt.Graphics;
import javax.swing.JPanel;
public class MyPanel extends JPanel
{
public void
paint(Graphics g)
{
//Draw house's
rectangle.
g.drawRect(200,
200, 200, 100);
//Draw house's
roof.
g.drawLine(200,
200, 300, 150);
g.drawLine(400,
200, 300, 150);
//Draw sun.
g.fillOval(100,100,50,50);
//Draw ground.
g.drawLine(200,
298, 0, 298);
g.drawLine(400,
298, 600, 298);
}
}
|
The
program above would create the following:
ADDING COLOR
It
is quite easy to change the drawing colour. We simply create a Color object and then
use the setColor method. There are two basic approaches to creating
a Color object.
First,
we can use built-in Color object constants.
To do this, we simply use
Color c = Color.BLACK;
Where
we can replace “BLACK” by many common colours such
as BLUE, PINK, RED, …
We
can also create a Color object by specifying the colours
RGB value.
Color c = new Color (255, 128, 0);
All
three numbers range from 0 to 255. The
statement above would have 255 red, 128 green and 0 blue mixed together to
create a colour.
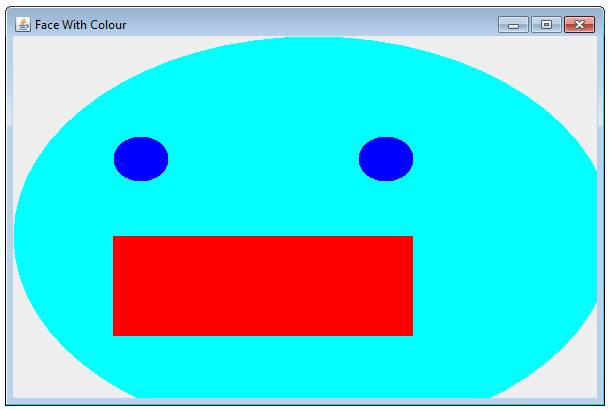
EXAMPLE
Consider
the code below:
|
//Filename:
FacePanelTester.java
import javax.swing.JFrame;
public class FacePanelTester
{
public static void
main(String[] args)
{
JFrame jf = new JFrame();
jf.setSize(600,400);
jf.setVisible(true);
jf.setTitle("Face
With Colour");
//Create
my panel and add it to JFrame object
FacePanel pan
= new FacePanel();
jf.add(pan);
}
}
|
|
//Filename:
FacePanel.java
import java.awt.Color;
import java.awt.Graphics;
import javax.swing.JPanel;
public class FacePanel extends JPanel
{
public void
paint(Graphics g)
{
//Set
drawing color to cyan using built-in cyan colour.
Color c1 = Color.CYAN;
g.setColor(c1);
//Draw head.
g.fillOval(0,
0, 600, 400);
//Set drawing color to
blue.
Color c2 = new
Color (0,0,255);
g.setColor(c2);
//Draw
both eyes.
g.fillOval(100,
100, 55, 45);
g.fillOval(345,
100, 55, 45);
//Set
drawing color to red.
Color c3 = new
Color (255,0,0);
g.setColor(c3);
//Draw
rectangular mouth.
g.fillRect(100,
200, 300, 100);
}
}
|
It
will create the following:
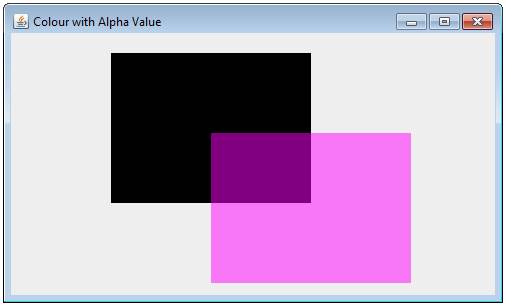
TRANSPARENT COLOURS
(ALPHA VALUE)
You
can create a Color object that has an alpha value (transparency value). Consider the code below:
|
import javax.swing.JFrame;
public class AlphaColourTester
{
public static void
main(String[] args)
{
JFrame jf = new JFrame();
jf.setSize(500,300);
jf.setVisible(true);
jf.setTitle("Colour with Alpha Value");
//Create my panel and add it to JFrame
object
AlphaColourPanel pan = new AlphaColourPanel();
jf.add(pan);
}
}
|
|
import java.awt.Color;
import java.awt.Graphics;
import javax.swing.JPanel;
public class AlphaColourPanel extends JPanel
{
public void
paint(Graphics g)
{
//Set color to black.
Color c1 = Color.black;
g.setColor(c1);
//Fill a
rectangle.
g.fillRect(100,
20, 200, 150);
//Create a new
color object. The 4th parameter is
//the alpha
value. (Zero is fully transparent
while
//255 is fully
opaque.)
Color c2 = new
Color(255,0,255,128);
g.setColor(c2);
//Fill a new
rectangle. It will be partially transparent.
g.fillRect(200,100,200,150);
}
}
|
The
above code will create the following:
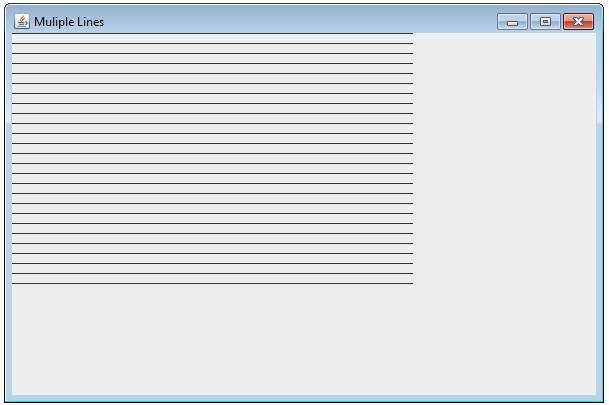
PROCESSING IN A LOOP
We
can use a loop to output many shapes.
Each time in the loop, we can alter the location of the shape as well
as the colour of the shape.
EXAMPLE 1
Consider
the code below:
|
//filename:
LoopLinesTester.java
import javax.swing.JFrame;
public class LoopLinesTester
{
public static void
main(String[] args)
{
JFrame jf = new JFrame();
jf.setSize(600,400);
jf.setVisible(true);
jf.setTitle("Muliple Lines");
//Cool Gradient
LoopLinesPanel
pan = new LoopLinesPanel();
jf.add(pan);
}
}
|
|
//filename:
LoopLinesPanel.java
import java.awt.Color;
import java.awt.Graphics;
import javax.swing.JPanel;
public class LoopLinesPanel extends JPanel
{
public void paint(Graphics g)
{
for (int y = 0; y
<= 255; y=y+10)
{
g.drawLine(0,y,400,y);
}
}
}
|
The code above will create the
following:
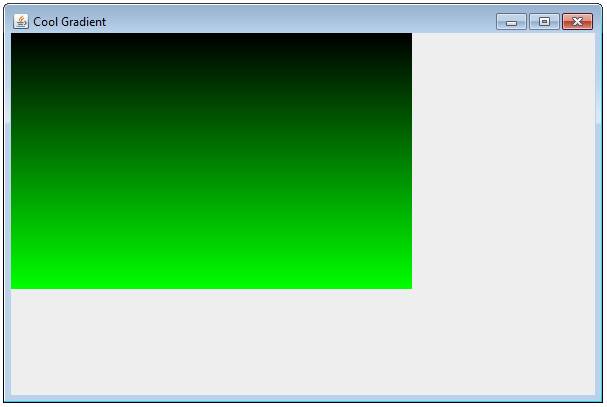
EXAMPLE 2
Consider
the code below. The GradientPanel code simply draws 255 different lines each
one one pixel lower than the previous one. As the lines are drawn, the drawing colour is gradually changed as well.
|
//Filename:
GradientTester.java
import javax.swing.JFrame;
public class GradientTester
{
public static void
main(String[] args)
{
JFrame jf = new JFrame();
jf.setSize(600,400);
jf.setVisible(true);
jf.setTitle("Cool
Gradient");
//Cool Gradient
GradientPanel
pan = new GradientPanel();
jf.add(pan);
}
}
|
|
//Filename:
GradientPanel.java
import java.awt.Color;
import java.awt.Graphics;
import javax.swing.JPanel;
public class GradientPanel extends JPanel
{
public void paint(Graphics g)
{
for (int y = 0; y
<= 255; y++)
{
Color c = new Color
(0,y,0);
g.setColor(c);
g.drawLine(0,y,400,y);
}
}
}
|
The
code above will create:

|