|
Java
Swing - GUIs
TOPIC 04 – LAYOUTS

LESSON NOTE
There
are different ways to specify how to place components on a JFrame (and also a
JPanel). Each of these ways is called
a layout. In this lesson, we will look
at different layouts that may be useful.
FLOWLAYOUT
The
FlowLayout class organizes components from left to right until there is no
more room and then restarts again on the next line. Resizing the window gives you an excellent
idea how this work.
Note
that FlowLayout will crunch down JPanels that don't contain other
JComponents. There may be a way around
this by setting the panel's size.
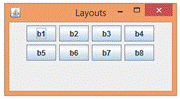
Here
are screen captures that show the FlowLayout working after window resizing.
The code that created the
windows above is below
|
public
class MyGUI extends JFrame implements ActionListener
{
//datafields
public JButton b1,b2,b3,b4,b5,b6,b7,b8;
public MyGUI()
{
Container cp = this.getContentPane();
cp.setLayout(new
FlowLayout());
b1 = new JButton("b1");
b2 = new JButton("b2");
b3 = new JButton("b3");
b4 = new JButton("b4");
b5 = new JButton("b5");
b6 = new JButton("b6");
b7 = new JButton("b7");
b8 = new JButton("b8");
cp.add(b1);
cp.add(b2);
cp.add(b3);
cp.add(b4);
cp.add(b5);
cp.add(b6);
cp.add(b7);
cp.add(b8);
this.setTitle("Layouts");
this.setSize(280,150);
this.setVisible(true);
}
public void actionPerformed(ActionEvent
e)
{
}
public static void main(String[] args)
{
MyGUI mg = new MyGUI();
}
}
|
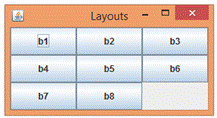
GRIDLAYOUT
The
GridLayout class organizes components in a specific number of rows and
columns. The components are stretched
out to fit the grid.
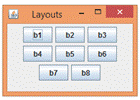
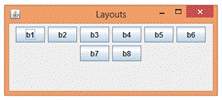
Here
are a few GridLayout examples. The
first and second examples use a GridLayout(4,2) but the second also makes use
of the pack() method. The third
example uses a GridLayout(3,3).
The code to generate the above examples is below. The only line that is different from the
previous code is highlighted.
|
public
class MyGUI extends JFrame implements ActionListener
{
//datafields
public JButton b1,b2,b3,b4,b5,b6,b7,b8;
public MyGUI()
{
Container cp = this.getContentPane();
cp.setLayout(new
GridLayout(3,3));
b1 = new JButton("b1");
b2 = new JButton("b2");
b3 = new JButton("b3");
b4 = new JButton("b4");
b5 = new JButton("b5");
b6 = new JButton("b6");
b7 = new JButton("b7");
b8 = new JButton("b8");
cp.add(b1);
cp.add(b2);
cp.add(b3);
cp.add(b4);
cp.add(b5);
cp.add(b6);
cp.add(b7);
cp.add(b8);
this.setTitle("Layouts");
this.setSize(280,150);
this.setVisible(true);
}
public void actionPerformed(ActionEvent
e)
{
}
public static void main(String[] args)
{
MyGUI mg = new MyGUI();
}
}
|
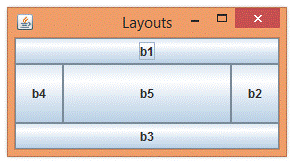
BORDERLAYOUT
The
BorderLayout class provides us with the ability to place up to five
components it locations around the border or at the center. When we add a component to the layout, we
have to specify if it is to be placed at the north, east, south, west or
center.
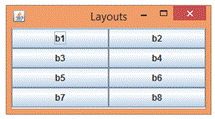
Here
is an example of BorderLayout in use:
The code to generate this
is below. Note that the BorderLayout
does require a little more information when adding components to the content
pane (highlighted).
|
public
class MyGUI extends JFrame implements ActionListener
{
//datafields
public JButton b1,b2,b3,b4,b5,b6,b7,b8;
public MyGUI()
{
Container cp = this.getContentPane();
cp.setLayout(new
BorderLayout());
b1 = new JButton("b1");
b2 = new JButton("b2");
b3 = new JButton("b3");
b4 = new JButton("b4");
b5 = new JButton("b5");
//b6 = new JButton("b6");
//b7 = new JButton("b7");
//b8 = new JButton("b8");
cp.add(b1,BorderLayout.NORTH);
cp.add(b2,BorderLayout.EAST);
cp.add(b3,BorderLayout.SOUTH);
cp.add(b4,BorderLayout.WEST);
cp.add(b5,BorderLayout.CENTER);
//cp.add(b6,BorderLayout.NORTH);
//cp.add(b7,BorderLayout.EAST);
//cp.add(b8,BorderLayout.SOUTH);
this.setTitle("Layouts");
this.setSize(280,150);
this.setVisible(true);
}
public void actionPerformed(ActionEvent
e)
{
}
public static void main(String[] args)
{
MyGUI mg = new MyGUI();
}
}
|
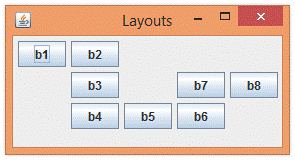
SPRINGLAYOUT
The
SpringLayout class allows you to very conveniently place components based on
the location of other components or to the content pane. You are essentially using the following
level of commands that are called constraints:
- "Place the left side of the
button b1 5 pixels away from the left side of the content pane."
- "Place the top side of the
button b1 10 pixels away from the top side of the content pane."
Unfortunately,
this can be long enough to do for each constraint is a little long to type
out. But it works so well!
EXAMPLE
Here
is a little GUI created with SpringLayout:
The
GUI above was create by the code below.
Note that there are comments to explain the code.
|
public class MyGUI extends JFrame implements ActionListener
{
//datafields
public JButton
b1,b2,b3,b4,b5,b6,b7,b8;
public MyGUI()
{
Container cp = this.getContentPane();
SpringLayout layout = new SpringLayout();
cp.setLayout(layout);
b1 = new JButton("b1");
b2 = new JButton("b2");
b3 = new JButton("b3");
b4 = new JButton("b4");
b5 = new JButton("b5");
b6 = new JButton("b6");
b7 = new JButton("b7");
b8 = new JButton("b8");
//BUTTON #1
//Place the top of b1 5 pixels from top of cp
layout.putConstraint(SpringLayout.NORTH, b1, 5, SpringLayout.NORTH,
cp);
//Place the left of b1 5 pixels from the left of cp
layout.putConstraint(SpringLayout.WEST, b1, 5, SpringLayout.WEST,
cp);
cp.add(b1);
//BUTTON #2
//Place the top of b2 0 pixels from top of b1
layout.putConstraint(SpringLayout.NORTH, b2, 0, SpringLayout.NORTH,
b1);
//Place the left of b2 5 pixels from the right of b1
layout.putConstraint(SpringLayout.WEST, b2, 5, SpringLayout.EAST,
b1);
cp.add(b2);
//BUTTON #3
//Place the top of b3 5 pixels from bottom of b2
layout.putConstraint(SpringLayout.NORTH, b3, 5, SpringLayout.SOUTH,
b2);
//Place the left of b3 0 pixels from the left of b2
layout.putConstraint(SpringLayout.WEST, b3, 0, SpringLayout.WEST,
b2);
cp.add(b3);
//BUTTON #4
//Place the top of b4 5 pixels from bottom of b3
layout.putConstraint(SpringLayout.NORTH, b4, 5, SpringLayout.SOUTH,
b3);
//Place the left of b4 0 pixels from the left of b3
layout.putConstraint(SpringLayout.WEST, b4, 0, SpringLayout.WEST,
b3);
cp.add(b4);
//BUTTON #5
//Place the top of b5 0 pixels from top of b4
layout.putConstraint(SpringLayout.NORTH,
b5, 0, SpringLayout.NORTH, b4);
//Place the left of b5 5 pixels from the right of b4
layout.putConstraint(SpringLayout.WEST, b5, 5, SpringLayout.EAST,
b4);
cp.add(b5);
//BUTTON #6
//Place the top of b6 0 pixels from top of b5
layout.putConstraint(SpringLayout.NORTH, b6, 0, SpringLayout.NORTH,
b5);
//Place the left of b6 5 pixels from the right of b5
layout.putConstraint(SpringLayout.WEST, b6, 5, SpringLayout.EAST,
b5);
cp.add(b6);
//BUTTON #7
//Place the bottom of b7 -5 (upwards) pixels from top of b6
layout.putConstraint(SpringLayout.SOUTH, b7, -5, SpringLayout.NORTH,
b6);
//Place the left of b7 0 pixels from the left of b6
layout.putConstraint(SpringLayout.WEST, b7, 0, SpringLayout.WEST,
b6);
cp.add(b7);
//BUTTON #8
//Place the top of b8 0 pixels from top of b7
layout.putConstraint(SpringLayout.NORTH, b8, 0, SpringLayout.NORTH,
b7);
//Place the left of b8 5 pixels from the right of b7
layout.putConstraint(SpringLayout.WEST, b8, 5, SpringLayout.EAST,
b7);
cp.add(b8);
this.setTitle("Layouts");
this.setSize(280,150);
this.setVisible(true);
}
public void
actionPerformed(ActionEvent e)
{
}
public static void
main(String[] args)
{
MyGUI mg = new MyGUI();
}
}
|
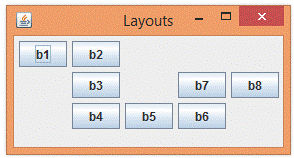
CAMPEAUSPRINGLAYOUT
The
CampeauSpringLayout is an extension of the original SpringLayout created by
Mr. Campeau to simplify the coding process.
It takes advantage of the idea that we mostly want to align items
vertically or horizontally and provides methods to do this. In exchange for simplicity, it does provide
less options than SpringLayout.
Unfortunately,
you need the file CampeauSpringLayout.java to use it. Click here
for a text file containing the source code.
Simply add it as its own class.
EXAMPLE (SAME AS SPRINGLAYOUT)
Here
is the same GUI created with CampeauSpringLayout:
The above GUI was create
with the following code:
|
public
class MyGUI extends JFrame implements ActionListener
{
//datafields
public JButton b1,b2,b3,b4,b5,b6,b7,b8;
public MyGUI()
{
Container cp = this.getContentPane();
CampeauSpringLayout
layout = new CampeauSpringLayout();
cp.setLayout(layout);
b1 = new JButton("b1");
b2 = new JButton("b2");
b3 = new JButton("b3");
b4 = new JButton("b4");
b5 = new JButton("b5");
b6 = new JButton("b6");
b7 = new JButton("b7");
b8 = new JButton("b8");
layout.placeAt(b1,
5, 5, cp);
cp.add(b1);
layout.placeRightOf(b2, 5, b1);
cp.add(b2);
layout.placeUnder(b3, 5, b2);
cp.add(b3);
layout.placeUnder(b4, 5, b3);
cp.add(b4);
layout.placeRightOf(b5, 5, b4);
cp.add(b5);
layout.placeRightOf(b6, 5, b5);
cp.add(b6);
layout.placeAbove(b7,5,b6);
cp.add(b7);
layout.placeRightOf(b8,5,b7);
cp.add(b8);
this.setTitle("Layouts");
this.setSize(280,150);
this.setVisible(true);
}
public void actionPerformed(ActionEvent
e)
{
}
public static void main(String[] args)
{
MyGUI mg = new MyGUI();
}
}
|

|