|
Java
Swing - GUIs
TOPIC 02 – INTERACTIVITY WITH ACTIONLISTENER

LESSON NOTE
ACTIONS
For
now, actions (events) will consist of one of two things:
- Clicking a button;
- Hitting <enter> while
inside a text field.
|
EXAMPLE 0 - BASIC GUI
To
understand how to add interactivity, we will revisit the code for a basic
GUI. Our GUI will have only a button
on it.
Here
is the code for our starting GUI:
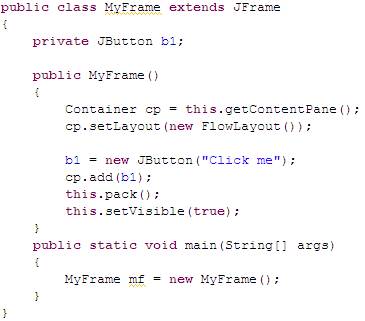
The
code above creates:
|
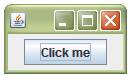
ACTIONLISTENER INTERFACE
Java’s
ActionListener interface is designed to listen for
events and automatically execute the actionPerformed
method when such an action occurs. As
programmers, we implement this interface and override the actionPerformed
method to specify which response we want for this action.
We
can make any class implement the ActionListener
interface and take care of the listening duty. However, it makes sense to do this in the
main application class because the datafields are
accessible there.
So
here are the steps to include the interactivity:
- Add implements ActionListener on the first line.
- In the constructor, make this
class be the Listener by adding:
componentName.addActionListener(this);
where the
componentName is the name of a button or text
field.
- Add the actionPerformed(ActionEvent e) method in the class. This method is required by the
interface that we implemented in the first point above.
- Inside the actionPerformed
method, respond however you'd like to the action that has occurred. More details on this later.
|
EXAMPLE 1 - OUR FIRST
INTERACTIVE GUI
We
can place both the visual components of the GUI and the actionPerformed
method inside a single class. This
does allow for a one-stop-shop programming approach but does make the code
a little messy.
|
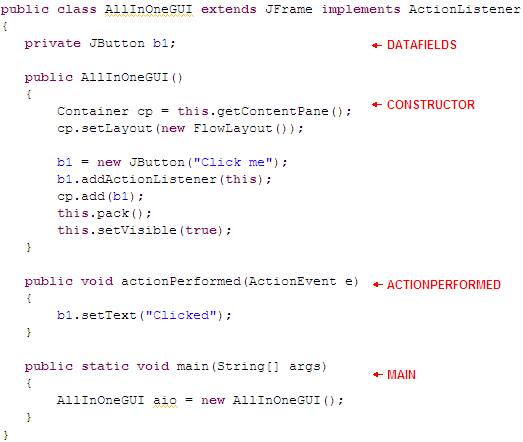
REMEMBERING
INFORMATION
If
we want to remember information between events, then that information has to
be stored in a datafield. As always, we declare the datafield at the top, we initialize it in the constructor
and then we update it and use it as we want in the actionPerformed
method.
|
EXAMPLE 2 – COUNTING
THE CLICKS
Here’s
the same example as above but counting the number of clicks. Notice that we can actually set the text
of the button with the setText method.
|
MONITORING MULTIPLE
COMPONENTS
We
can monitor more than one component by simply adding action listeners to each
component that we want to monitor. Of
course, any of the components will trigger the same actionPerformed
method.
|
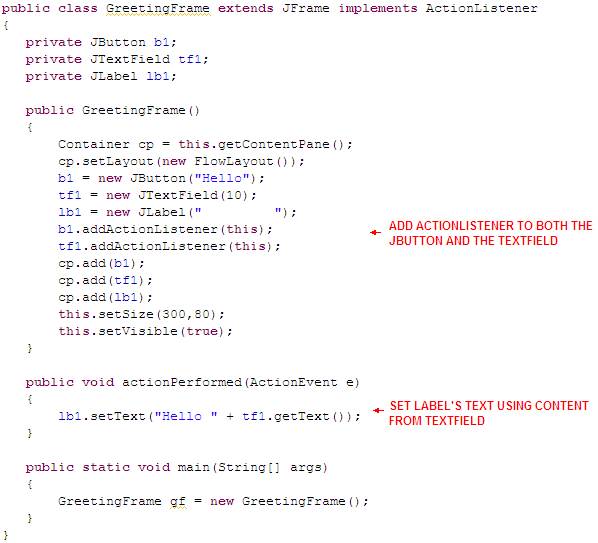
EXAMPLE 3 – GREETING
APP
In
this application, we will allow both the button and the text field to
generate the response. Both will
generate the same response.
|
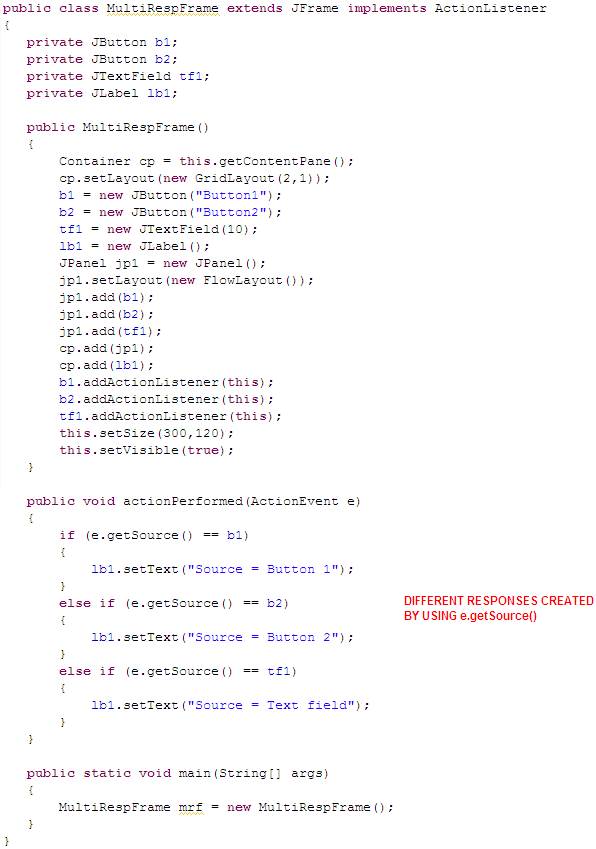
DIFFERENTIATING BETWEEN
COMPONENTS
When
there are more than one components that could trigger an action event, we
often need to know which component actually did trigger the event. This can easily be done by using the getSource method from ActionEvent.
|
EXAMPLE 4 – DIFFERENT
RESPONSES
GUIs
usually require different responses depending on the source of the
event. We can do this quite easily
using e.getSource() inside the actionPerformed
method.
|

|