|
Java TOPIC 25 – IMPLEMENTING A LINKED LIST
LESSON WORK
GROUP
WORK – PARTIAL IMPLEMENTATION OF A LINKED LIST We will implement a linked list as a group. While you can certainly do this work
without Mr. Campeau, there is a fair bit of complexity in the code that will
be hard to understand on your own. Of
course, you are welcome to try… J
STEP
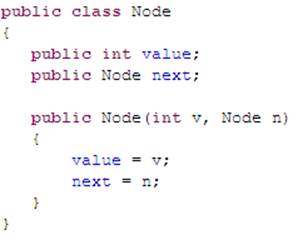
1 To do this, we will need the classes listed below. Create them. Node.java STEP 2 The
Node class will allow us to create simple objects that contain a value and a
reference to the next node in the linked list.
Click
here for the full code listing of this class in a text
file. STEP 3 We
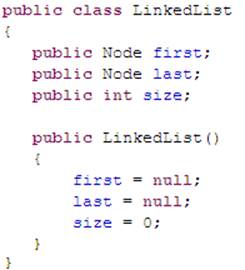
will now look at creating the LinkedList.java class. We will break this down into several
steps. Some
linked list implementations only have a reference to the first Node in the
list. Ours will also hold a reference
to the last Node in the list. We will
also have a data field that keeps track of the size of the list. We’ll
start with the following code:
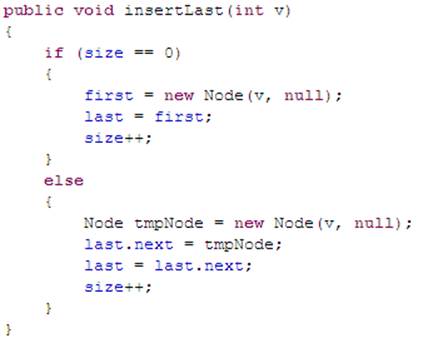
STEP 4 Before
we can do any sort of testing, we have to be able to insert values into our
linked list. We’ll implement a method
that will insert a value at the end of the linked list. This
method will deal with two cases, one where the linked list is empty
beforehand, and one when the linked list is not empty. It’s
important to note that any new data will be stored inside a new Node. If
the list is empty then that Node is both the first and the last node in the
list. On
the other hand, if the list is not empty, then that new Node has to become
the last node. This requires two
steps. First, we must change the
reference in the previous last node from NULL to our new Node. Then, in the linked list, we have to change
the reference called last so that it now refers to our new Node.
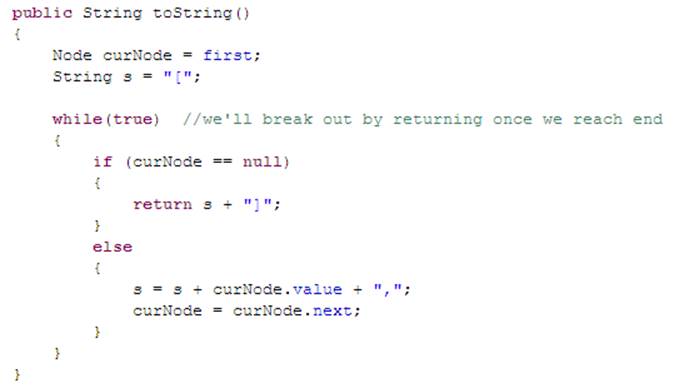
STEP 5
STEP 6 We
also need to have the ability to have a String representation of the Linked
List. We do this by simply walking
through the list one Node at a time and adding its value to a String. We do this till we reach the last Node.
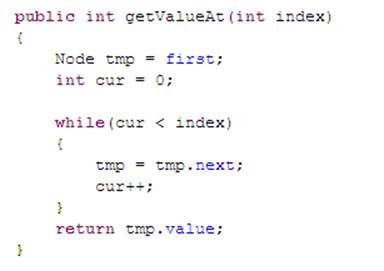
STEP 7 Finally,
we need a way to get the value of a Node at a certain location in the list.
STEP 8 –
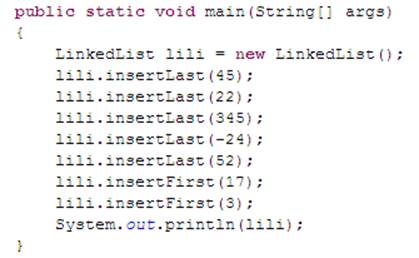
TESTING TIME Inside
the Tester class, add the main method.
Inside that, add statements that add valued to the linked list and
then print out the contents of the linked list. See below for a possible example.
Note
that in the last statement, System.out.println(lili), we are automatically calling lili.toString().
The
code above will output the following:
|
|
|
|