JPAINT
PART 1 – THE
GUI
![]()
In this step, we will focus on creating the components and organizing them inside a Java application. Remember that your goal is not to recreate an exact copy of the GUI seen here. Make it look however you want. Of course, it helps if it looks good!
STEP 1
Create a simple application called JPaint that extends JFrame. Give it a size, a title and make it visible. Run your application to make sure it works. It should look something like this:

STEP 2
Start by designing your toolbar. The buttons on the toolbar will be grouped together. You should probably place all the buttons on a single JPanel with a GridLayout. Of course, this is your choice.
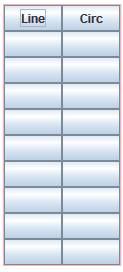
In order to get an idea of the button sizes, you might want to name a few of
them. This is done because GridLayout will automatically size all components to the
size of the largest one. Also, the JPanel in the image above has a border colour done with the
line of code:
panelName.setBorder(BorderFactory.createLineBorder(Color.pink));
Here’s possible pseudocode to get this done:
|
1-Set cp to content pane. 2-Set cp’s layout to FlowLayout for now. 3-Create all the buttons. Include text for a few of them. 4-Create a JPanel. 5-Set JPanel’s layout to GridLayout. 6-Add buttons to JPanel. 7-Add border to JPanel. 8-Add JPanel to cp. |
STEP 3
Add another JPanel that will serve as our canvas later.
Possible pseudocode:
|
1-Create a new JPanel called canvas. 2-Give the canvas a preferred size. 3-Give the canvas a border (see step 2 for help). 4-Add JPanel to cp. |
STEP 4
Add a JTextArea that will take care of the History of the user’s actions. For now, it will be very useful as a debugging and testing tool for us.
If you have time, you can make the JTextArea have a scrollbar by creating a JScrollPane object with the JTextArea. Again, this is optional. You might also only care to do this later on when you are adding functionality to the GUI.
STEP 5
You now need to make all of this look good together. Essentially, you need to size everything and make things line up. I would probably suggest a different layout manager. I used MySpringLayout and finished with the following:
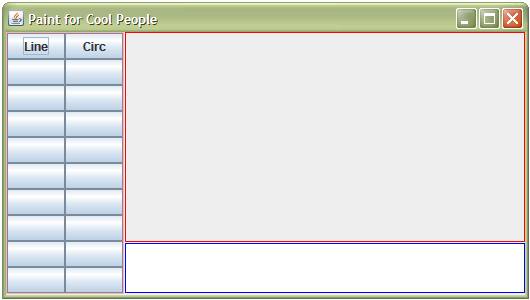
Note #1: I will use better border colours later.
Note #2: I’ve sized everything to work with these buttons. Of course, everything gets a little messed up if I add longer text on any one of the buttons. So more touching up will be needed.
That’s it. Hopefully this step wasn’t too GUI for you! J
EXTRAS?
Do you feel you have extra time? Want to improve the GUI? Here are a few ideas:
· Figure out how to add a small image to a button instead of using text.
· Create a few small images that you will use.
· Improve the borders.
· Add an options section for the tools.
· Add a toolbar at the top.
![]()